This article has been excerpted from book "The Complete Visual C# Programmer's Guide" from the Authors of C# Corner.
This program will allow the user to send mail from his mobile device. Here we use a mail server and make use of the classes provided in the System.Web.Mail namespace. We also make elaborate use of validation controls.
Listing 24.10: Mail Sending Application
<%@ Page Inherits="System.Web.UI.MobileControls.MobilePage" Language="C#" %>
<%@ Register TagPrefix="mobile" Namespace="System.Web.UI.MobileControls" Assembly="System.Web.Mobile" %>
<%@ Import Namespace="System.Web.Mail" %>
<script language="c#" runat="server">
protected void Submit_OnClick(Object sender, EventArgs e)
{
if (Page.IsValid)
{
/// Make an object of MailMessage Class
MailMessage message = new MailMessage();
///Set the Fields
message.To = to.Text;
message.From = from.Text;
message.Subject = subject.Text;
///Set u r Mail Server here
SmtpMail.SmtpServer = "c-sharpcorner.com";
/// This will send the Message
SmtpMail.Send(message);
/// Give the Confirmation as the Message has been sent
confirm.Text = "Mail has been sent to " + to.Text;
//Activate Second Form
this.ActiveForm = Form2;
}
}
</script>
Listing 24.10 is the final action in the example. When the user submits the form, the Submit_OnClick method is called, and once the message is e-mailed, Form2 is activated. But first we have to get input from the user for both the To and From fields. We will limit the data we collect, as it is difficult to type on a phone (see Listing 24.11).
Listing 24.11: Mail Sending: User Interface
<mobile:form id="Form1" runat="server">
<mobile:Label runat="server">
FROM :
</mobile:Label>
<mobile:TextBox id="from" runat="server"/>
<mobile:RequiredFieldValidator
id="FromValidator1"
ControlToValidate="from" runat="server">
Enter from address
</mobile:ReuiredFieldValidator>
<mobile:RegularExpressionValidator
id="FromValidator2"
ControlToValidate="from"
ValidationExpression="\w+([-+.]\w+)*@\w+([-.]\w+)
*\.\w+([-.]\w+)*"
runat="server">
Enter a valid Email Id
</mobile:RegularExpressionValidator>
<mobile:Label runat="server">
TO:
</mobile:Label>
<mobile:TextBox id="to" runat="server"/>
<mobile:RequiredFieldValidator
id="toValidator1"
ControlToValidate="to" runat="server">
Enter to address
</mobile:RequiredFieldValidator>
<mobile:RegularExpressionValidator
ControlToValidate="to"
ValidationExpression="\w+([-+.]\w+)*@\w+
([-.]\w+)*\.\w+([-.]\w+)*"
runat="server">
Enter a valid Email Id
</mobile:RegularExpressionValidator>
<mobile:Label runat="server">
MESSAGE:
</mobile:Label>
<mobile:TextBox id="subject" runat="server"/>
<mobile:Command runat="server" OnClick="Submit_OnClick">
Submit
</mobile:Command>
</mobile:form>
<mobile:form id="Form2" runat="server">
<mobile:Label id ="confirm" runat="server">
</mobile:Label>
</mobile:form>
The validators will allow the Submit function to be called only after the page has been validated. Do not forget the IsValid property, as was mentioned earlier.
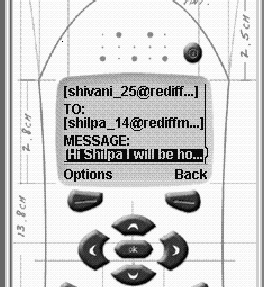
The output shown in Figure 24.19 should appear on the phone screen.

Figure 24.19: Input Screen for From and To E-Mail Address and Message
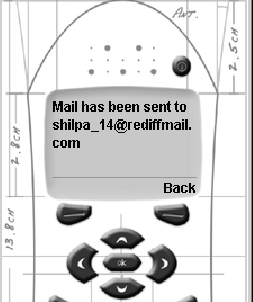
If all the fields are valid and you are pointing to a valid SMTP server, then your output should appear as shown in Figure 24.20.

Figure 24.20: Confirmation Screen When User Clicks on Send Button
This is how easy it is to use the functionality of ASP.NET classes in your mobile controls.
Conclusion
Hope this article would have helped you in understanding Mobile Mail sending Application using ASP.NET. See other articles on the website on .NET and C#.
 |
The Complete Visual C# Programmer's Guide covers most of the major components that make up C# and the .net environment. The book is geared toward the intermediate programmer, but contains enough material to satisfy the advanced developer. |