Introduction
I have been writing and recording videos on architecture, design patterns, UML, enterprise blocks, estimation, and code reviews.
Installing and download StyleCop
StyleCop analyzes C# code with a set of rules to check whether the code follows the rules.If you click on the downloads section you will see three setup's one is the StyleCop setup which actually installs the software and the other two are CHM help files. One help file talks about the rules and other about the API exposed by StyleCop.Once you install StyleCop nothing will be seen as in start menu. When you open any project of C# and right click on the project you should see two menus in the project as shown in figure below. One which helps us select the rules i.e. the Style cop settings menu and the other which run these rules on the C# project.
Figure 1.
If you just run the style cop you should see broken rules in output window as shown in below figure.

Figure 2.
Comparing FXCOP with StyleCop
| FXCOP |
StyleCop |
| It runs on compiled DLLs. |
It runs on actual source code. |
| As it runs on compiled IL code it can be used for C#, VB.NET, in short any language which compiles to IL code. |
Currently it runs only on C#. |
Currently I can only think about two differences if any one knows more let me know so that I can update this. Many people are asking for a comparison table for these two codes review tools.
Issue of Code review using FXCOP
FXCOP works on the actual compiled DLL. For instance a switch method shown below can be compiled to dictionary of string by the .NET compiler. Due to this we can not actually measure what kind of quality the code has. The conversion from actual source code to IL is very much non-linear.
This is where StyleCop has an extra edge as it operates directly on the source code. The only negative point it has currently is that it only worksfor C#.
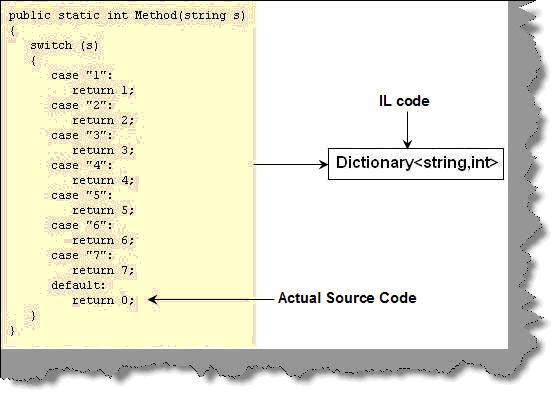
Figure 3.
StyleCop Code parsing logic
StyleCop has two important concepts one is the document and the other the elements. Document is the file and elements are everything inside the file.
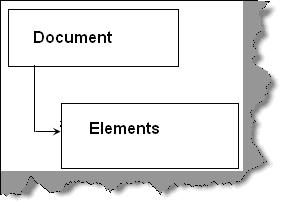
Figure 4.
For instance below is a simple source code which has two methods, properties and variables.
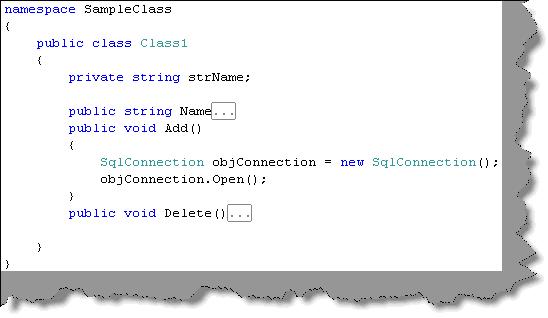
Figure 5.
So stylecop treats every thing inside the document as an element. Now let's understand how stylecop browses through the document by implementing a custom rule in stylecop.
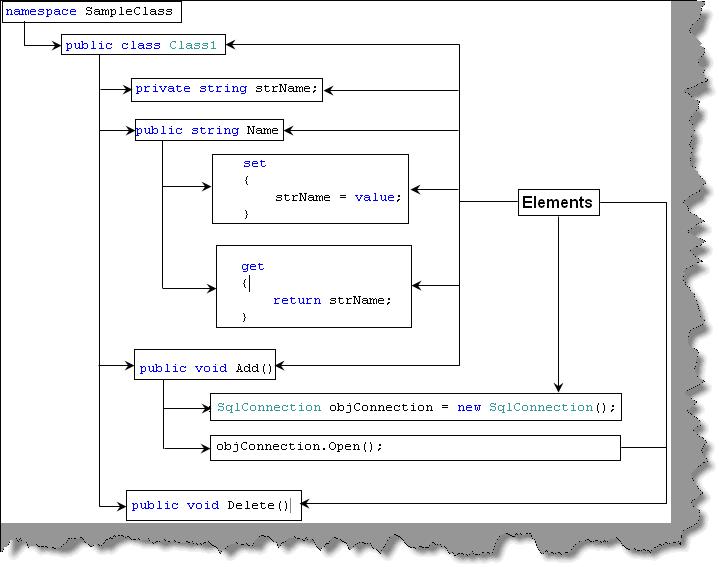
Figure 6.
Making the custom rules class
The first thing is to import stylecop namespaces. Please ensure to give references from c:\Program files\Microsoft Style Cop folder.
using Microsoft.StyleCop.CSharp;
using Microsoft.StyleCop;
All style cop custom rule classes should inherit from 'SourceAnalyzer'class.
[SourceAnalyzer(typeof(CsParser))]
public class MyRules : SourceAnalyzer
When the style cop starts running it first hits the 'analyzedocument'method. So override the method and let's put our logic in this.
{
public override void AnalyzeDocument(CodeDocument document)
}
In the analyze document we type cast the document in to CsDocument class. As we had previously said that stylecop walks through the document and then walks through each element. This it achieves by using delegates and visitor pattern. The 'WalkDocument'method visits the 'VisitElement'for every element in the source code.
CsDocument document2 = (CsDocument)document;
if (document2.RootElement != null && !document2.RootElement.Generated)
{
document2.WalkDocument(new CodeWalkerElementVisitor<object>(this.VisitElement), null, null);
}
The 'VisitElement'defined in the 'WalkDocument'method is a delegate. So we need to also define that delegate. You can see in the below code how we have defined the delegate and used the element object to check whether its method or not. If the element is a method then you can perform some logic. If there is any violation we need to add the same in to the violation collection using 'AddViolation'method as shown in the below snippet.
private bool VisitElement(CsElement element, CsElement parentElement, object context)
{
if (element.ElementType == ElementType.Method)
{
this.AddViolation(parentElement, "MyCustomRule", "BlockStatementsShouldNotBeEmpty");
}
}
One of the values we pass to the rule is 'MyCustomRule'value. This is nothing but the XML file. Below is a sample of a GOTO sample rule. When you compile the DLL you need to ensure that this XML file is compiled as an embedded resource.
<SourceAnalyzer Name="Custom ules">
<Description> Custom rules added to analyzer. </Description>
<Rules>
<RuleGroup Name="Database">
<Rule Name="MyCustomRule" CheckId="HE3333">
<Context>Always close the connection object</Context>
<Description>Always close the connection object</Description>
</Rule>
</RuleGroup>
</Rules>
</SourceAnalyzer>
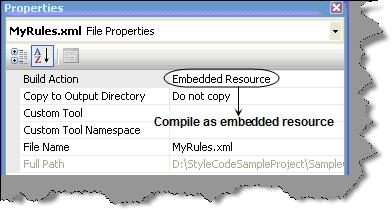
Figure 7.
Once you have compiled the DLL you need to put the DLL in "C:\Program Files\Microsoft StyleCop 4.3\" folder. If every thing is fine you should see the rules in the rules dialog box as shown in below figure.
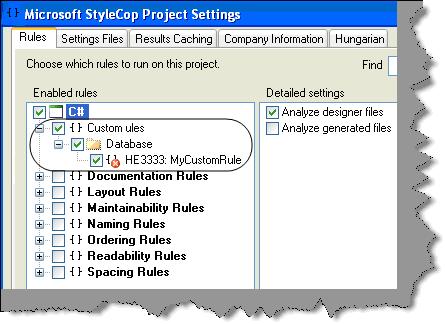
Figure 8.
Let us do something practically
So let's take up something practically. Let's say we want to check if any connection object is opened it should be closed. So let's write some good logic in the "Visit Element" delegate.
The first thing we will do is define two variables 'boolFoundConnectionOpen'which states that the connection object is opened. Second 'boolFoundConnectionClosed'which indicates that the connection object is closed.
bool boolFoundConnectionOpen=false;
bool booFoundConnectionClosed=false;
In the 'VisitElement'delegate we type cast the element document in to 'CsDocument'type and read the source in to a 'TextReader'.
CsDocument document3 = (CsDocument)element.Document;
System.IO.TextReader objReader = document3.SourceCode.Read();
Ok now we look through the reader object and start reading the code. If we find a ".Open"we set the 'boolFoundConnectionOpen'to true. If we find a corresponding close we set 'boolFoundConnectionClosed'to true.
while ((strCode = objReader.ReadLine()) != null)
{
if (strCode.Contains(".Open();"))
{
boolFoundConnectionOpen = true;
}
if (boolFoundConnectionOpen)
{
if (strCode.Contains(".Close();"))
{
booFoundConnectionClosed = true;
}
}
}
Now the final thing. If we find that the connection is open and not closed we just add to the violation collection the rule.
if ((boolFoundConnectionOpen) && (booFoundConnectionClosed == false))
{
this.AddViolation(parentElement, "MyCustomRule", "BlockStatementsShouldNotBeEmpty");
}
Run and enjoy You can see in the below figure we do not have a connection closed. You can see how the error is displayed in the output window.
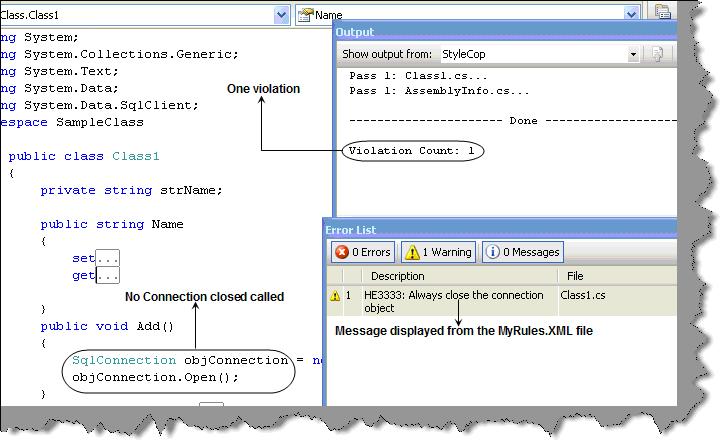
Figure 9.
We have attached the source code with this article , please feel free to experiment with it.