Introduction
In this article describes how to use a VisualBrush in WPF. VisualBrush is a new addition to the brush types since GDI+. A VisualBrush is used to fill UI elements.
With a VisualBrush, you can define a simple or complex UI element and assign it to the VisualBrush.Visual property. Then you can paint other parts of your screen with this conglomerate brush. You get a number of performance benefits from the VisualBrush because WPF can use a copy of the the pixels it has already rendered.
VisualBrush has five TileMode properties:
- FlipX
- FlipY
- FlipXY
- None
- Tile
Getting Started
The VisualBrush element of XAML represents a Visual Brush. You treat this brush as other brushes. For example, you can set this brush as a background property of a window or a control. The TileMode property is used to set the tile of the brush. The Visual property of VisualBrush sets the visual and it can be an image. For example, the following code snippet creates a VisualBrush and sets its FlipX and Visual properties.
<VisualBrush TileMode="FlipX" Viewport="0,0,0.5,0.5">
<VisualBrush.Visual>
<Image Source="Raj 039.JPG"></Image>
</VisualBrush.Visual>
</VisualBrush>
The following code snippet sets the visual property to an Image.
FlipX:
<Window
x:Class="WPF_VisualBrush.Window1"
xmlns="http://schemas.microsoft.com/winfx/2006/xaml/presentation"
xmlns:x="http://schemas.microsoft.com/winfx/2006/xaml"
Title="VisualBrush in WPF" Height="400" Width="400">
<Window.Background>
<VisualBrush TileMode="FlipX" Viewport="0,0,0.5,0.5">
<VisualBrush.Visual>
<Image Source="Raj 039.JPG"></Image>
</VisualBrush.Visual>
</VisualBrush>
</Window.Background>
</Window>
The output looks like Figure 1.
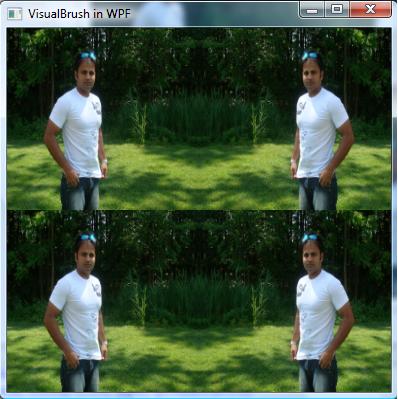
Figure 1
FlipY:
<Window x:Class="WPF_VisualBrush.Window1"
xmlns="http://schemas.microsoft.com/winfx/2006/xaml/presentation"
xmlns:x="http://schemas.microsoft.com/winfx/2006/xaml"
Title="VisualBrush in WPF" Height="400" Width="400">
<Window.Background>
<VisualBrush TileMode="FlipY" Viewport="0,0,0.5,0.5">
<VisualBrush.Visual>
<Image Source="Raj 039.JPG"></Image>
</VisualBrush.Visual>
</VisualBrush>
</Window.Background>
</Window>
The FlipY output looks like Figure 2.
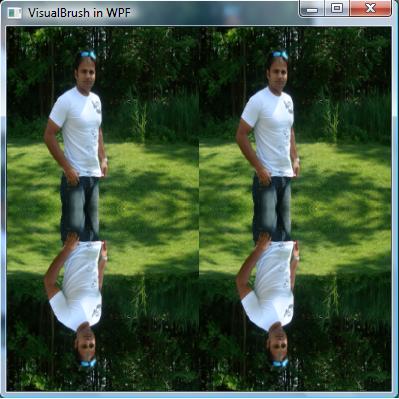
Figure 2.
FlipXY:
<Window x:Class="WPF_VisualBrush.Window1"
xmlns="http://schemas.microsoft.com/winfx/2006/xaml/presentation"
xmlns:x="http://schemas.microsoft.com/winfx/2006/xaml"
Title="VisualBrush in WPF" Height="400" Width="400">
<Window.Background>
<VisualBrush TileMode="FlipXY" Viewport="0,0,0.5,0.5">
<VisualBrush.Visual>
<Image Source="Raj 039.JPG"></Image>
</VisualBrush.Visual>
</VisualBrush>
</Window.Background>
</Window>
The FlipXY output looks like Figure 3.
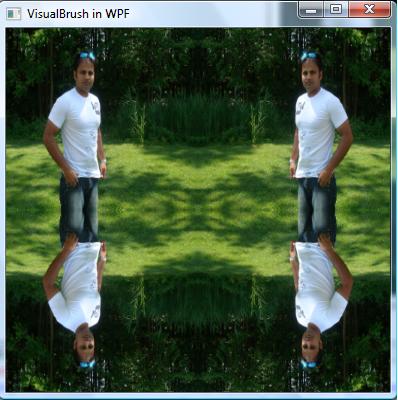
Figure 3.
None:
<Window x:Class="WPF_VisualBrush.Window1"
xmlns="http://schemas.microsoft.com/winfx/2006/xaml/presentation"
xmlns:x="http://schemas.microsoft.com/winfx/2006/xaml"
Title="VisualBrush in WPF" Height="400" Width="400">
<Window.Background>
<VisualBrush TileMode="None" Viewport="0,0,0.5,0.5">
<VisualBrush.Visual>
<Image Source="Raj 039.JPG"></Image>
</VisualBrush.Visual>
</VisualBrush>
</Window.Background>
</Window>
The None (no visual brush) output looks like Figure 4.
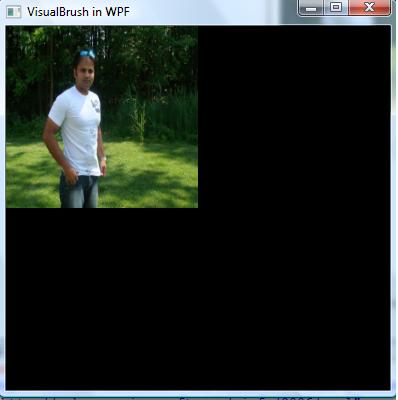
Figure 4.
Tile:
<Window x:Class="WPF_VisualBrush.Window1"
xmlns="http://schemas.microsoft.com/winfx/2006/xaml/presentation"
xmlns:x="http://schemas.microsoft.com/winfx/2006/xaml"
Title="VisualBrush in WPF" Height="400" Width="400"> <Window.Background>
<VisualBrush TileMode="Tile" Viewport="0,0,0.5,0.5">
<VisualBrush.Visual>
<Image Source="Raj 039.JPG"></Image>
</VisualBrush.Visual>
</VisualBrush>
</Window.Background>
</Window>
The Tile output looks like Figure 5.
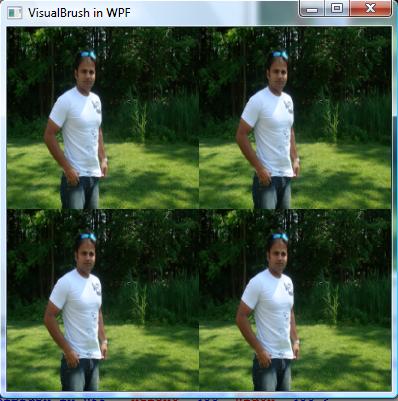
Figure 5.
The Visual Brush can be applied to any control. It doesn't have to be a Windows as shown in my previous example. It can be a button, a rectangle, or a TextBox.
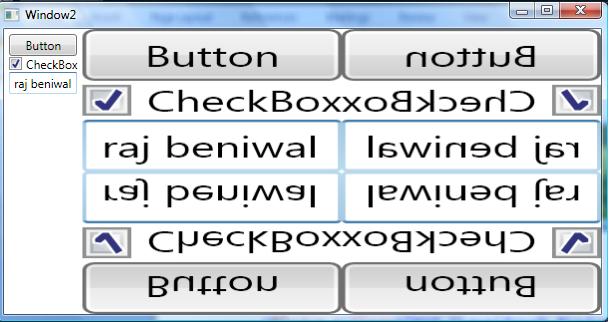
Let's see one more example with a Rectangle. In the following code snippet, I will a rectangle with a Visual Brush and set its TileMode property.
<Window x:Class="WPF_VisualBrush.Window2"
xmlns="http://schemas.microsoft.com/winfx/2006/xaml/presentation"
xmlns:x="http://schemas.microsoft.com/winfx/2006/xaml"
Title="Window2">
<DockPanel>
<StackPanel Margin="5" x:Name="Panel">
<Button>Button</Button>
<CheckBox>CheckBox</CheckBox>
<TextBox></TextBox>
</StackPanel>
<Rectangle>
<Rectangle.Fill>
<VisualBrush TileMode="FlipXY" Viewport="0,0,0.5,0.5" Visual="{Binding ElementName=Panel}"></VisualBrush>
</Rectangle.Fill>
</Rectangle>
</DockPanel>
</Window>
The output generates the following Figure.
Summary
In this article, we discussed how to use a VisualBrush in WPF.