Introduction
This article describes an approach to sending email messages with or without attachments. The code required to send the message is contained within a reusable class. In addition to sending messages and messages with attachments, the class also validates the recipient email addresses using regular expression validation.
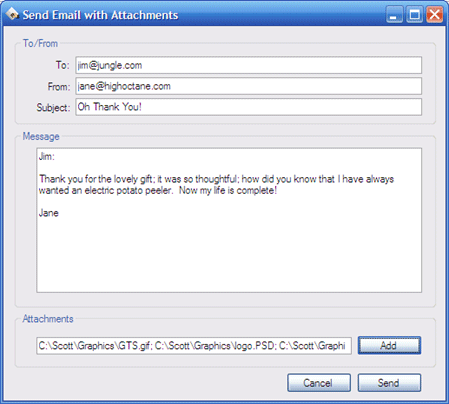
Figure 1: Test Application Main Form
SMTP Configuration
Setting up IIS
Your local IIS instance has to be properly configured in order to successfully send an email message through its SMTP mail server. Even if you install IIS, the SMTP mail server installation is optional and must be explicitly added to the installation. If you are not sure whether or not the SMTP mail server is installed, open up the IIS control panel and check for the installation; if it is installed you will see a reference to the Default SMTP Virtual Server in the tree view (Figure 2):
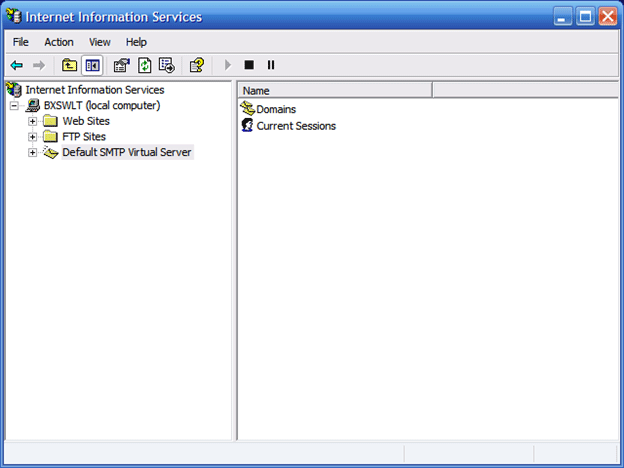
Figure 2: Default SMTP Virtual Server Installed
If the server is not installed, you will need to use the "Add and Remove Windows Components" function in the "Add and Remove Programs" control panel to add the SMTP server to your IIS installation. If you need to do this additional installation, once you've opened the "Add and Remove Windows Components", click on "Internet Information Services (IIS)" to highlight it and then click on the "Details" button (Figure 3). This will open an IIS dialog; examine this dialog to locate "SMTP Service" and click on it to place a check mark on the box (Figure 4). Once this item has been checked, click on the "OK" button to install the SMTP server.
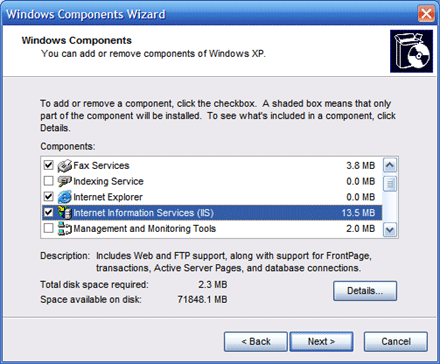
Figure 3: Windows Components Wizard
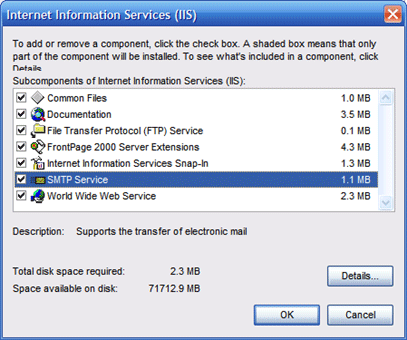
Figure 4: Adding the SMTP Service to IIS
Once the default SMTP server has been installed or verified; you can now configure it to send email. In order to configure the SMTP server, open the IIS control panel, locate the default SMTP server icon in the treeview, and select and right click the icon. Once the context menu has been displayed, locate "Properties" and click on it to open the properties menu.
Once the Default SMTP Virtual Server Properties dialog is displayed click on the "Access" tab (Figure 5):
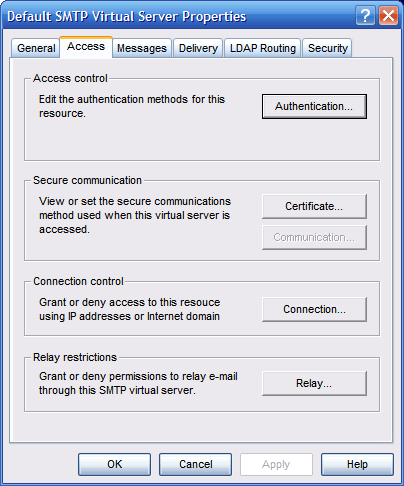
Figure 5: SMTP Property Dialog
Select the "Authentication" button to display the authentication options (Figure 6):
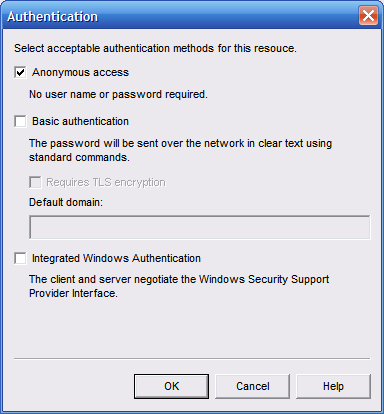
Figure 6: Authentication Options
Make sure that the Anonymous access option is checked and that all other options are unchecked; in some instances you may wish to use the other options but in most cases involving a public website this is the option you'd want. Once you have verified this setting, click "OK" to close this dialog.
Back to the "Access" tab, locate and click on the "Relay" button to display the relay options. Note that the radio button for "Only the list below" is selected, and that the local host IP address has been added to the list of computers permitted to relay through the SMTP server. Naturally this is OK for a development machine but in deployment, you would use the actual IP address of the web server. If no IP addresses are shown in the list, click on the "Add" button and add the IP address. Once finished, click on the "OK" button to accept the changes and to dismiss the dialog. (Figure 7)
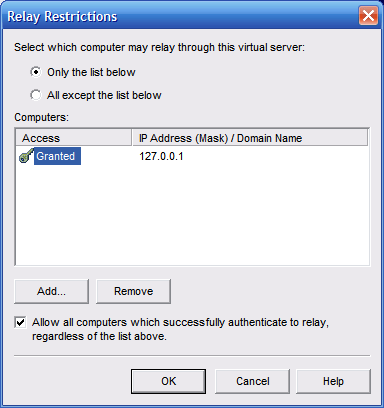
Figure 7: Relay Restrictions Dialog
Next, select the "Delivery" tab from the SMTP Server properties dialog (Figure 8):
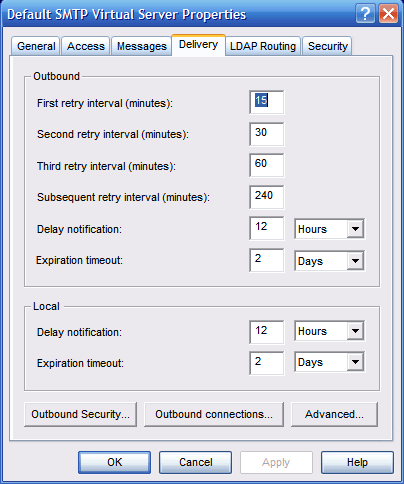
Figure 8: Delivery Options Dialog
From this dialog, select the "Advanced" button to reveal the advanced options dialog (Figure 10):
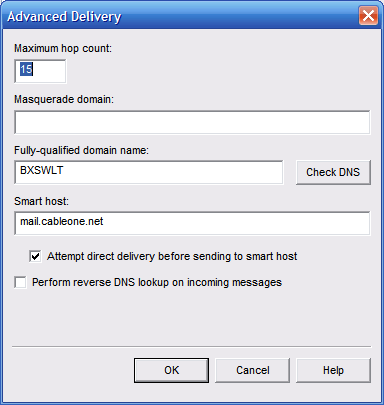
Figure 9: Advanced Delivery Dialog
From this dialog there are two points to make; first, the "Fully qualified domain name" property should be pre-populated; you may click on the "Check DNS" button to validate the setting. The next option is probably the most critical item for the whole shooting match; the Smart Host property has to be set to point to a valid SMTP mail server that will permit you to relay mail. For most cases, you will key in the name of your internet provider's default SMTP mail server; the address is likely to be in the format of "mail.something.com" where "something" is the internet provider's domain name. There are two easy ways to get this, one is, if you are using Outlook, open up Outlook and pull up the information on your email account; the mail server will be listed there. The second option is to guess and you can qualify your guess by pinging the server.
If your internet provider's name is "foxtrox", try pinging mail.foxtrot.com; if you get a response there, that is probably the one to use. If that does not work, contact your administrator and ask them for the information on the SMTP mail server; don't try to plug in an Exchange server, there will likely be an SMTP mail server out there even if your company is using an Exchange server. The only other hurdle is to make sure that the SMTP mail server will allow you to relay and again, you may need to talk to the administrator if the server bounces your mail. Once these settings are made, click on the "OK" button to save the settings and close the dialog.
The last thing to do is to check the security tab to make sure the accounts are properly configured; once done your security settings should look something like this (Figure 10):
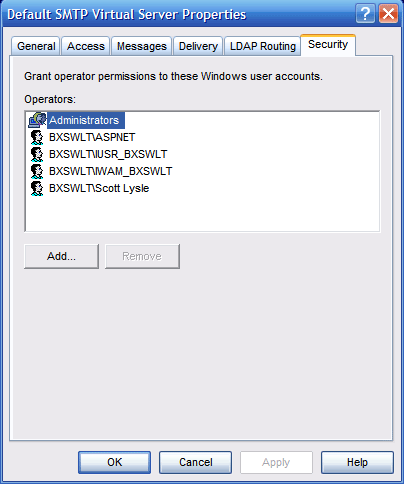
Figure 10: Security Settings for the SMTP Server
Once everything is setup, click on the "OK" button to save the settings and to close the Default SMTP Virtual Server Properties dialog.
Getting Started:
In order to get started, unzip the included project and open the solution in the Visual Studio 2008 environment. In the solution explorer, you should note these files (Figure 11):
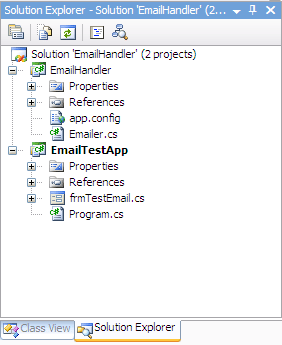
Figure 11: Solution Explorer
The solution contains two projects; the EmailHandler project is a class library; it contains a class entitled, "Emailer.cs" which contains all of the code necessary to send email messages with and without attachments, and to validate email addresses. The second project is entitled, "EmailTestApp"; this is a win forms application which provides an interface that may be used to construct and send email messages using the Emailer class functions.
Code: Emailer.cs
The Emailer class is used to send email messages with or without attachments, and it contains the code used to validate the format of the email addresses used to define the email sender and recipient.
The class begins with the default and added imports; note the addition of System.Net.Mail, System.Net.Mime, and System.Text.RegularExpressions.
using System;
using System.Data;
using System.Configuration;
using System.Collections;
using System.Linq;
using System.Net.Mail;
using System.Net.Mime;
using System.Text.RegularExpressions;
using System.Web;
The next section contains the namespace and class declarations.
namespace EmailHandler
{
public class Emailer
{
The first method contained in this class is used to send an email message without an attachment. The method collects the recipient email address, the sender's email address, the email subject line, and the message body as arguments. Within the code, the recipient's email address is validated, a new mail message is constructed using the passed in arguments, an instance of an SMTP client is created using the mail server (stored in the properties), a Boolean is set to enable the requests to include the default credentials, and then the message is sent. If the action succeeds, the method will return a string indicating that the submittal was successful, else, the exception message will be returned to the caller.
/// <summary>
/// Transmit an email message to a recipient without
/// any attachments
/// </summary>
/// <param name="sendTo">Recipient Email Address</param>
/// <param name="sendFrom">Sender Email Address</param>
/// <param name="sendSubject">Subject Line Describing Message</param>
/// <param name="sendMessage">The Email Message Body</param>
/// <returns>Status Message as String</returns>
public static string SendMessage(string sendTo, string sendFrom,
string sendSubject, string sendMessage)
{
try
{
// validate the email address
bool bTest = ValidateEmailAddress(sendTo);
// if the email address is bad, return message
if (bTest == false)
return "Invalid recipient email address: " + sendTo;
// create the email message
MailMessage message = new MailMessage(
sendFrom,
sendTo,
sendSubject,
sendMessage);
// create smtp client at mail server location
SmtpClient client = new
SmtpClient(Properties.Settings.Default.SMTPAddress);
// add credentials
client.UseDefaultCredentials = true;
// send message
client.Send(message);
return "Message sent to " + sendTo + " at " +
DateTime.Now.ToString() + ".";
}
catch (Exception ex)
{
return ex.Message.ToString();
}
}
That next method contained in the class is used to send an email message with an attachment. This method is the same as the previous with the exception being that it also accepts an array list containing the paths to files to be included as attachments to the message. The code is annotated and should be easy enough to follow.
/// <summary>
/// Transmit an email message with
/// attachments
/// </summary>
/// <param name="sendTo">Recipient Email Address</param>
/// <param name="sendFrom">Sender Email Address</param>
/// <param name="sendSubject">Subject Line Describing Message</param>
/// <param name="sendMessage">The Email Message Body</param>
/// <param name="attachments">A string array pointing to the location
of each attachment</param>
/// <returns>Status Message as String</returns>
public static string SendMessageWithAttachment(string sendTo, string
sendFrom, string sendSubject, string sendMessage, ArrayList
attachments)
{
try
{
// validate email address
bool bTest = ValidateEmailAddress(sendTo);
if (bTest == false)
return "Invalid recipient email address: " + sendTo;
// Create the basic message
MailMessage message = new MailMessage(
sendFrom,
sendTo,
sendSubject,
sendMessage);
// The attachments array should point to a file location
// where
// the attachment resides - add the attachments to the
// message
foreach (string attach in attachments)
{
Attachment attached = new Attachment(attach,
MediaTypeNames.Application.Octet);
message.Attachments.Add(attached);
}
// create smtp client at mail server location
SmtpClient client = new
SmtpClient(Properties.Settings.Default.SMTPAddress);
// Add credentials
client.UseDefaultCredentials = true;
// send message
client.Send(message);
return "Message sent to " + sendTo + " at " +
DateTime.Now.ToString() + ".";
}
catch (Exception ex)
{
return ex.Message.ToString();
}
}
The last method contained in the Emailer class is used to validate an email address; this is accomplished by validating the address against a regular expression.
/// <summary>
/// Confirm that an email address is valid
/// in format
/// </summary>
/// <param name="emailAddress">Full email address to validate</param>
/// <returns>True if email address is valid</returns>
public static bool ValidateEmailAddress(string emailAddress)
{
try
{
string TextToValidate = emailAddress;
Regex expression = new Regex(@"\w+@[a-zA-Z_]+?\.[a-zA-
Z]{2,3}");
// test email address with expression
if (expression.IsMatch(TextToValidate))
{
// is valid email address
return true;
}
else
{
// is not valid email address
return false;
}
}
catch (Exception)
{
throw;
}
}
}
}
Code: frmTestEmailer.cs
This form class is the only class contained in the test application; it provides a simple interface for building an email message with attachments.
The class begins with the default imports.
using System;
using System.Collections;
using System.ComponentModel;
using System.Data;
using System.Drawing;
using System.Linq;
using System.Text;
using System.Windows.Forms;
using EmailHandler;
The next section contains the namespace and class declarations.
namespace EmailTestApp
{
/// <summary>
/// Test Application Form:
/// This application is used to test sending
/// email and email with attachments.
/// </summary>
public partial class frmTestEmail : Form
{
Following the class declaration, an ArrayList is declared; this is used to contain the attachments added to the email message.
/// <summary>
/// An arraylist containing
/// all of the attachments
/// </summary>
ArrayList alAttachments;
/// <summary>
/// Send an email message with or without attachments
/// </summary>
/// <param name="sender"></param>
/// <param name="e"></param>
private void btnSend_Click(object sender, EventArgs e)
{
if (String.IsNullOrEmpty(txtSendTo.Text))
{
MessageBox.Show("Missing recipient address.", "Email Error");
return;
}
if (String.IsNullOrEmpty(txtSendFrom.Text))
{
MessageBox.Show("Missing sender address.", "Email Error");
return;
}
if (String.IsNullOrEmpty(txtSubjectLine.Text))
{
MessageBox.Show("Missing subject line.", "Email Error");
return;
}
if (String.IsNullOrEmpty(txtMessage.Text))
{
MessageBox.Show("Missing message.", "Email Error");
return;
}
string[] arr = txtAttachments.Text.Split(';');
alAttachments = new ArrayList();
for (int i = 0; i < arr.Length; i++)
{
if (!String.IsNullOrEmpty(arr[i].ToString().Trim()))
{
alAttachments.Add(arr[i].ToString().Trim());
}
}
// if there are attachments, send message with
// SendMessageWithAttachment call, else use the
// standard SendMessage call
if (alAttachments.Count > 0)
{
string result =
Emailer.SendMessageWithAttachment(txtSendTo.Text,
txtSendFrom.Text, txtSubjectLine.Text, txtMessage.Text,
alAttachments);
MessageBox.Show(result, "Email Transmittal");
}
else
{
string result = Emailer.SendMessage(txtSendTo.Text,
txtSendFrom.Text, txtSubjectLine.Text, txtMessage.Text);
MessageBox.Show(result, "Email Transmittal");
}
}
}
}