Before reading this article, please go through the article, whose link is given below-
- Introduction To Universal Windows Platform (UWP) App Development Using Windows 10 And Visual Studio 2015
When a new item is added in the list view, it's added at the end of the item and then the KeepLastItemInView scroll mode will scroll the new last item into view. This concept is mainly used for chat Applications.
After reading this article, you will learn how to create Bottom up List, using ItemstackPanel in List View Control and UWP with XAML and Visual C#. Also, we are adding new items in the bottom(end) and deleting the selected item in the list.
The important tools, which are required to develop UWP are given below-
- Windows 10 (Recommended)
- Visual Studio 2015 Community Edition (It is a free software available online)
Now, we can discuss step by step app development.
Step 1 - Open Visual Studio 2015 -> Start -> New Project-> Select Universal (under Visual C#->Windows)-> Blank app -> Give the suitable name for your app (UWPBtmUPLV) ->OK.
![Visual studio]()
Step 2 - Choose the Target and minimum platform version for your Windows Universal Application will support it. Afterwards, the project creates App.xaml and MainPage.xaml.
![Visual studio]()
Step 3 - Open (double click) the file MainPage.xaml in the Solution Explorer and click on the Toolbox tab on the left to open the list of common XAML controls. Expand common XAML controls and drag the required control to the middle of the design canvas.
After dragging and dropping, in the TextBlock control, you have to change the name and text property for the title.
![Visual studio]()
Add the Scroll viewer control.
![Visual studio]()
Add the stack panel inside the Scroll viewer.
![Visual studio]()
After dragging and dropping, the ListView control is there and inside it is the stack panel. Change the Name, BorderThickness and BorderBrush property.
![Visual studio]()
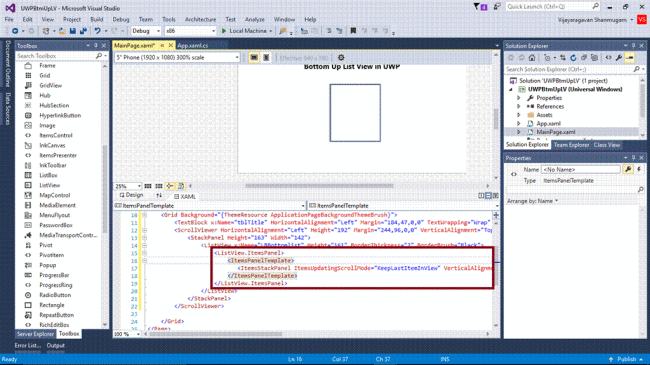
Step 4 - Add the code for ItemPanelTemplate, given below-
- <ListView.ItemsPanel>
-
- <ItemsPanelTemplate>
-
- <ItemsStackPanel ItemsUpdatingScrollMode="KeepLastItemInView" VerticalAlignment="Bottom" />
-
- </ItemsPanelTemplate>
-
- </ListView.ItemsPanel>
 ">
">
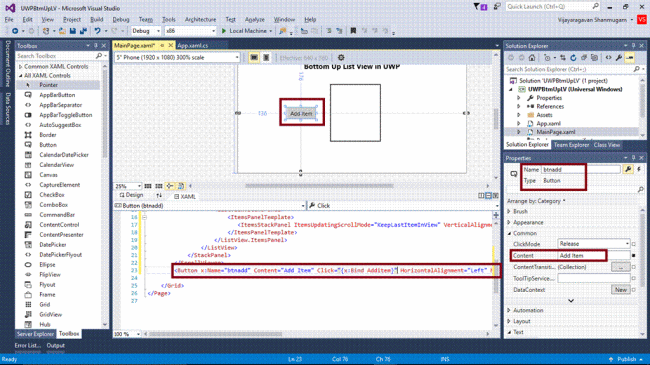
Step 5 - Add a button to add items in a ListView.
">
Add a button to delete the items in a ListView.
![]() Note -
Note - Automatically, the code, given below will be generated in XAML code view, while we are done in the design view.
- <Page x:Class="UWPBtmUpLV.MainPage" xmlns="http://schemas.microsoft.com/winfx/2006/xaml/presentation" xmlns:x="http://schemas.microsoft.com/winfx/2006/xaml" xmlns:local="using:UWPBtmUpLV" xmlns:d="http://schemas.microsoft.com/expression/blend/2008" xmlns:mc="http://schemas.openxmlformats.org/markup-compatibility/2006" mc:Ignorable="d">
-
- <Grid Background="{ThemeResource ApplicationPageBackgroundThemeBrush}">
-
- <TextBlock x:Name="tblTitle" HorizontalAlignment="Left" Margin="184,47,0,0" TextWrapping="Wrap" Text="Bottom Up List View in UWP" VerticalAlignment="Top" FontWeight="Bold" FontSize="20" RenderTransformOrigin="0.577,0.531" />
-
- <ScrollViewer HorizontalAlignment="Left" Height="192" Margin="244,96,0,0" VerticalAlignment="Top" Width="168">
-
- <StackPanel Height="163" Width="142">
-
- <ListView x:Name="LBBottomlist" Height="161" BorderThickness="2" BorderBrush="Black">
-
- <ListView.ItemsPanel>
-
- <ItemsPanelTemplate>
-
- <ItemsStackPanel ItemsUpdatingScrollMode="KeepLastItemInView" VerticalAlignment="Bottom" />
-
- </ItemsPanelTemplate>
-
- </ListView.ItemsPanel>
-
- </ListView>
-
- </StackPanel>
-
- </ScrollViewer>
-
- <Button x:Name="btnadd" Content="Add Item" Click="{x:Bind Additem}" HorizontalAlignment="Left" Margin="136,176,0,0" VerticalAlignment="Top" />
-
- <Button x:Name="btnDelete" Content="Delete Item" Click="{x:Bind Delitem}" HorizontalAlignment="Left" Margin="467,176,0,0" VerticalAlignment="Top" />
-
- </Grid>
-
- </Page>
Step 6 - Add the code, given below in Mainpage.xaml.cs
- int itemno;
-
- public MainPage()
-
- {
-
- this.InitializeComponent();
-
- Additem();
-
- }
-
- private void Additem()
-
- {
-
- LBBottomlist.Items.Add("Item " + (++itemno));
-
- }
-
- private void Delitem()
-
- {
-
- int selectedIndex = LBBottomlist.SelectedIndex;
-
- LBBottomlist.Items.Remove(LBBottomlist.SelectedItem);
-
- if (selectedIndex < LBBottomlist.Items.Count)
-
- {
-
- LBBottomlist.SelectedIndex = selectedIndex;
-
- }
-
- }
![int itemno; public MainPage() { this.InitializeComponent(); Additem(); } private void Additem() { LBBottomlist.Items.Add("Item " + (++itemno)); } private void Delitem() { int selectedIndex = LBBottomlist.SelectedIndex; LBBottomlist.Items.Remove(LBBottomlist.SelectedItem); if (selectedIndex < LBBottomlist.Items.Count) { LBBottomlist.SelectedIndex = selectedIndex; } }]()
Step 7 - Deploy of your app in Local Machine and output of the UWPBtmUPLV app is given below-
![int itemno; public MainPage() { this.InitializeComponent(); Additem(); } private void Additem() { LBBottomlist.Items.Add("Item " + (++itemno)); } private void Delitem() { int selectedIndex = LBBottomlist.SelectedIndex; LBBottomlist.Items.Remove(LBBottomlist.SelectedItem); if (selectedIndex < LBBottomlist.Items.Count) { LBBottomlist.SelectedIndex = selectedIndex; } }]()
Afterwards, click the Add Item.
![int itemno; public MainPage() { this.InitializeComponent(); Additem(); } private void Additem() { LBBottomlist.Items.Add("Item " + (++itemno)); } private void Delitem() { int selectedIndex = LBBottomlist.SelectedIndex; LBBottomlist.Items.Remove(LBBottomlist.SelectedItem); if (selectedIndex < LBBottomlist.Items.Count) { LBBottomlist.SelectedIndex = selectedIndex; } }]()
Select the item for delete
![int itemno; public MainPage() { this.InitializeComponent(); Additem(); } private void Additem() { LBBottomlist.Items.Add("Item " + (++itemno)); } private void Delitem() { int selectedIndex = LBBottomlist.SelectedIndex; LBBottomlist.Items.Remove(LBBottomlist.SelectedItem); if (selectedIndex < LBBottomlist.Items.Count) { LBBottomlist.SelectedIndex = selectedIndex; } }]()
Afterwards, click Delete item.
![int itemno; public MainPage() { this.InitializeComponent(); Additem(); } private void Additem() { LBBottomlist.Items.Add("Item " + (++itemno)); } private void Delitem() { int selectedIndex = LBBottomlist.SelectedIndex; LBBottomlist.Items.Remove(LBBottomlist.SelectedItem); if (selectedIndex < LBBottomlist.Items.Count) { LBBottomlist.SelectedIndex = selectedIndex; } }]() Summary
Summary - Now, you have successfully created and tested your Bottom up List, using ItemstackPanel in List View Control in Visual C# - UWP environment.