Figure 1 - The Star Trek Enterprise on a Mission
Introduction
Although I couldn't name all the episodes, I think I watched every original Star Trek episode that was produced. My fascination with Star Trek didn't end with the original, but continued into the Next Generation. After that, I kinda lost track...Anyway, this month, Microsoft came out with an article in MSDN on the XNA framework, written by Charles Cox and Michael Klucher. I became intrigued and decided to pursue exploring the XNA Framework. In doing so, I created this simple example. Most of the inspiration for this article didn't come from the MSDN article, but from a game called elves revenge on a website called Errolian. By examining this code, I was able to piece together this demonstration of XNA.
Getting Started with XNA
The XNA Framework was created so that any developer could easily put together a game that runs on either Windows or on XBox. The XNA Framework only works on Visual Studio Express, so even if you have Visual Studio Enterprise Team Suite, you'll still need to download Visual Studio Express. The good news is Visual Studio Express is FREE!! XNA is FREE!! XBox is...well...at least you can develop your app for the pc as well.
| What Does XNA Stand For? As far as I know XNA is not acronymic, but if I ventured a guess, it stands for (DirectX Next Generation Architecture) |
When you install XNA and Visual Studio Express, I think you'll find that if you are already a VS.NET developer, your development experience is almost exactly the same, minus a few cool features. You can begin developing your game right away by choosing File-->New Project and selecting Windows Game. If you want to start with some functionality in your project, you can choose SpaceWar Windows Starter Kit.
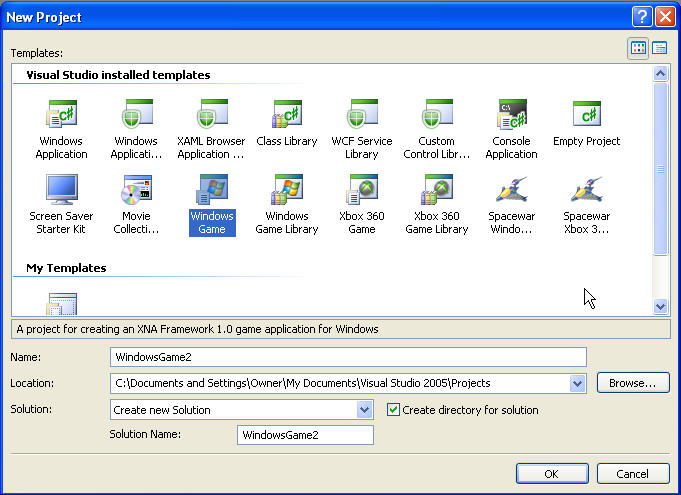
Figure 2 - Picking an XNA Template Project
This Template generates the most important class for your XNA Game development, the Game1 class. This class inherits from Microsoft.Xna.Framework.Game, which is essentially the Game Engine that hides some of the messy stuff involved in game development under the hood. In fact, for most of the game development, the only two methods you need to override in this class are the Update method and the Draw Method. The Update method is called every time the game needs to update its game data. And the Draw method...yeah, you guessed it...is called every time the game needs to paint to the screen.
So by now I bet a few dozen questions may have popped into your head.
How do I load my sprite from a bitmap?
How do I move my sprite? Rotate my sprite?
How do I create sound in XNA?
How do I accept input from the keyboard?
How do I detect a collision between sprites?
All these questions, and more will be answered in the paragraphs to follow:
Design
The UML Design of my Star Trek XNA game uses some of the pieces of the framework generated by the XNA wizard, but adds a Sprite class and a SpriteAnimation class. These two classes are the heart of the game design, and allow us to move shapes around the screen. In essence all game components including the ship, the enemy, the weapon, and even the background are all sprites. The EnemyExplosion class inherits from SpriteAnimation. This class plays a frame of the animation after each new game screen update.
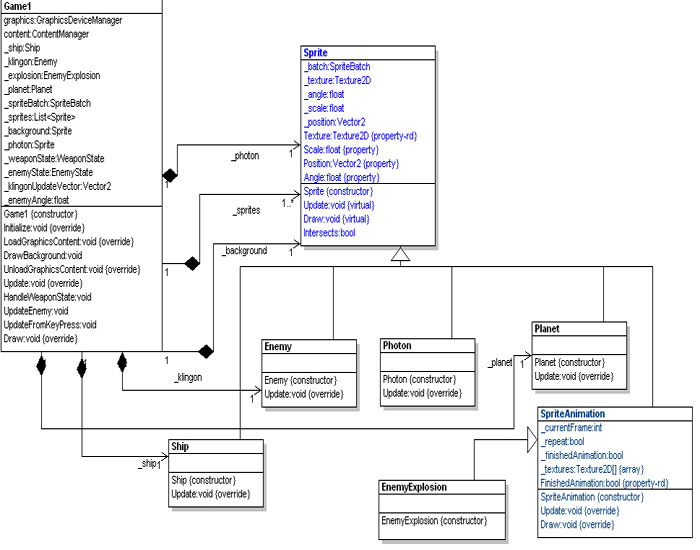
Figure 3 - UML Design of Star Trek Demo Reverse Engineered using WithClass
Loading the Images
The images in this game are of type Texture2D. If you want to make a 3D game, you would use Texture3D. Images can be conveniently loaded in an override of the LoadGraphicsContent method of the Game class provided for you in the template. Also provided for you is a ContentManager object in which you can use to load your content. You may also want to create an object called a SpriteBatch, that allows you to later draw your sprites as a batch. The following call allows us to load our graphic file into our sprite:
_photon =
new Sprite(_spriteBatch, content.Load<Texture2D>(@"Content\Textures\photon"));
If we had a 3D Mesh we wanted to load, then we just change the template to Texture3D:
_photon = new Sprite(_spriteBatch, content.Load<Texture3D>(@"Content\Textures\photon"));
Note, that in order to load your Content, the bitmaps in the content must be part of the project. I found that even if I had the image in the Content\Textures folder, it wouldn't load the image unless I actually had it as part of the project. This is because, XNA converts all images (and sounds) to its own format. Textures are made into .xnb files and sounds are stuck in a wavebank.
Keyboard Input
Keyboard Input is handled inside the Update method. If we want to respond to the space bar being pressed, we simply get all the keys pressed since the last Update and see if one of them is a space bar. Listing 1 shows the code inside update that checks for a space bar press:
Listing 1 - Checking if the Space Bar is Pressed
protected override void Update(GameTime gameTime)
{
KeyboardState state = Keyboard.GetState();
Keys[] keys = state.GetPressedKeys();
if (keys.Length > 0)
{
foreach (Keys nextKey in keys)
{
if (nextKey == Keys.Space)
{
if (_weaponState == WeaponState.IDLE)
{
_photon.Position = new Vector2(_ship.Position.X, _ship.Position.Y);
_photon.Angle = _ship.Angle;
Sound.Play("photon_torpedo");
}
}
}
} |
Moving a Sprite
In order to move a sprite on the screen, we need to update its position or angle. Translation and rotation are handled inside the Update method. The results of the transformation are later shown using the overriden Draw method. Looking at listing 1, we see that we are moving a photon torpedo. We set the initial photon torpedo to be at the coordinates of the Enterprise ship and angle the torpedo in the direction the ship is moving. Our homebrewed sprite class handles the translation of the missle through it's own Update method. The Update method of the Sprite class takes the delta change of position coordinates and the change in the angle and adds it to the sprite's current coordinates:
Listing 2 - Updating your Sprites Position and Angle
public virtual void Update(int dx, int dy, float diff_angle)
{
_position.X += ((float)dx) * (float)Math.Cos(_angle);
_position.Y += ((float)dx) * (float)Math.Sin(_angle);
_angle += diff_angle;
if (_position.X < 0) _position.X = 0;
if (_position.X > 1500) _position.X = 1500;
if (_position.Y < 0) _position.Y = 0;
if (_position.Y > 1500) _position.Y = 1500;
if (_angle > 6.28) _angle = 0;
} |
Drawing a Sprite
The sprites are drawn inside the Draw method of the Game object. Drawing is batched through the SpriteBatch object. Listing 3 shows the code needed to draw each of our game objects. Note that we draw different sprites depending upon the state of objects in the game.
Listing 3 - Drawing Our Game Objects
/// <summary>
/// This is called when the game should draw itself.
/// </summary>
/// <param name="gameTime">Provides a snapshot of timing values.</param>
protected override void Draw(GameTime gameTime)
{
// Make the background black
graphics.GraphicsDevice.Clear(Color.Black);
// Draw a starry space background
DrawBackground();
// Draw all the sprites in the sprite collection
foreach (Sprite sprite in _sprites)
{
sprite.Draw();
}
// draw the photon torpedo if it's launched
if (_weaponState == WeaponState.PHOTON_MOVING || _weaponState == WeaponState.PHOTON_START)
{
_photon.Draw();
}
// if the enemy is hit, draw one of the explosion animation frames
if (_enemyState == EnemyState.HIT)
{
_explosion.Draw();
}
else if (_enemyState == EnemyState.IDLE)
{
_klingon.Draw(); // otherwise draw the enemy in one piece
}
// don't forget to call the base class draw routine
base.Draw(gameTime);
} |
Sprites Draw themselves by batching through the SpriteBatch object. The SpriteBatch class has a method called Draw that allows us to draw our sprite, translated, rotated, and scaled giving us great flexibility in transforming our sprite. Listing 4 illustrates how the sprite is drawn through the SpriteBatch object.
Listing 4 - Drawing the Sprite with Transformations
public virtual void Draw()
{
_batch.Begin();
_batch.Draw(_texture, new Vector2(_position.X, _position.Y), new Rectangle(0, 0, _texture.Width, _texture.Height), Color.White, _angle, new Vector2(0, 0), _scale, SpriteEffects.None, .5f);
_batch.End();
} |
Creating a Sound
Creating Sounds in XNA turns out to be a little bit more than loading a file. In XNA, you need to use a tool called XACT.exe which is located in your \Program Files\Microsoft XNA\XNA Game Studio Express\v1.0\Tools folder. Xact allows you to drag wave files from explorer into what is called a wave bank. You then need to drag files from the wave bank into a sound bank. Finally you need to drag files from the sound bank into the Cue. It is inside the Cue that you can retrieve sounds and play them through your computer's sound card. This whole process of dragging and dropping sounds three times strikes me as a bit silly, but currently that is the situation. The sound classes in XNA are a bit finicky so make sure that eventually your sounds end up in the Cue or they won't play.
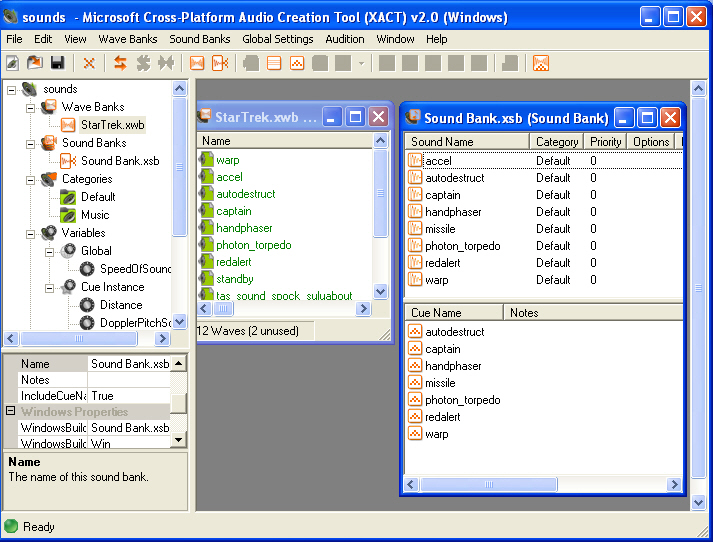
Figure 4 - XACT Showing the Wave Bank, Sound Bank, and Cue Windows
In this project, we have wrapped the Sound functionality in a Sound class to make things a bit easier.
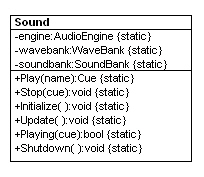
Figure 5 - Sound Class Wrapping XNA Sound Functions
However, you still need to make sure that you get all the names of the audio engine file, the sound bank file and wave bank file correct in the Initialize function of the Sound class shown in listing 5. Also make sure you have included sound.xap file you are using inside your project. This file will be automatically generated by XACT.exe.
Listing 5 - Initializing the Sound class
public static void Initialize()
{
engine = new AudioEngine(@"Content/SoundFX/sounds.xgs");
wavebank = new WaveBank(engine, @"Content/SoundFX/Wave Bank.xwb");
soundbank = new SoundBank(engine, @"Content/SoundFX/Sound Bank.xsb");
} |
If you've done everything correctly, then when you call Sound.Play with the name of the key in your Cue, then you will hear the specified sound. Sounds play asynchronously. If you want to play a sound synchronously, then you need to wait for it to finish and then stop it. Listing 6 shows the code for playing two sound synchronously (one after another):
Listing 6 - Playing the Red Alert Twice, Synchronously
Cue alert = Sound.Play("redalert");
while (Sound.Playing(alert)) ;
Sound.Stop(alert);
Cue alert1 = Sound.Play("redalert");
while (Sound.Playing(alert1)) ;
Sound.Stop(alert1); |
Detecting a Collision Between Sprites
The last XNA challenge we are going to talk about is how to detect a collision between sprites. You would think that this aspect of game development would be more obvious, but it actually requires a few steps. Collision detection is done using an object in XNA called a BoundingBox. The BoundingBox has an Intersects method you can use to test for collision. Because BoundingBox's require 3D Vectors to construct them, we need to create 3D vectors for each of the objects we are testing for collision. The first set of 3D vectors describes the minimum and maximum extent of the first object and the second set of 3D vectors describes the minimum and maximum extent of the second object: Each set of 3D vectors is used to create one BoundingBox. As you can see, there are a lot of hoops you need to jump through to test a collision. Since collision testing is a pretty common scenario in game development, it would be nice if there was an easier way to do this for 2D game development.
Listing 7 - Testing for Collision between Sprites
internal bool Intersects(Sprite sprite)
{
// create a set of 3D Vectors for the tested sprite object
Vector3 min1 = new Vector3( sprite.Position.X, sprite.Position.Y, 0 ); // Vector3 min1 = mimium co-ords of Sprite 1
Vector3 max1 = new Vector3( ( sprite.Position.X + sprite.Texture.Width ), ( sprite.Position.Y + sprite.Texture.Height), 0 ); // Vector3 max1 = maximum co-ords of Sprite 1
// create a set of 3D Vectors for this sprite object
Vector3 min2 = new Vector3( Position.X, Position.Y, 0 ); // Vector3 min1 = mimium co-ords of Sprite 1
Vector3 max2 = new Vector3( ( Position.X + Texture.Width ), ( Position.Y + Texture.Height), 0 ); // Vector3 max1 = maximum co-ords of Sprite 1
// create a bounding box for the tested sprite
BoundingBox box1 = new BoundingBox(min1, max1 * new Vector3(0.99f, 0.99f, 0)); // Multiply BoundingBox of Sprite1 by 0.99 to provide 1% leniency
// create a bounding box for this sprite
BoundingBox box2 = new BoundingBox(min2, max2 * new Vector3(0.99f, 0.99f, 0)); // Multiply BoundingBox of Sprite2 by 0.99 to provide 1% leniency
// test to see if they have collided
return box1.Intersects(box2);
} |
The Game
The sprites finally come to life once we have hammered out the details. In the sample, The left and right arrow moves the enterprise ship and the R key rotates it. Hitting the SpaceBar fires a photon torpedo at the Klingon. If you hit the Klingon, the Klingon Explodes using the ExplosionAnimation. I used Paint.NET to draw most of the sprites you see here as well as the Explosion Sequence. Paint.NET is a free painting utility that is actually quite advanced. Once you get the hang of it, you can draw some pretty cool game objects.
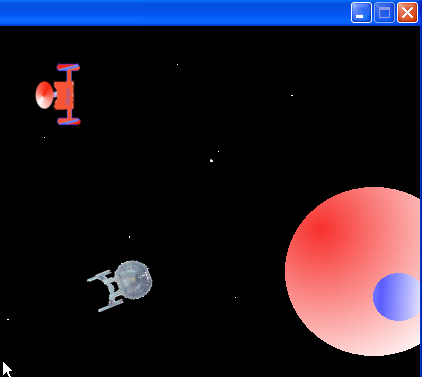
Figure 6 - Star Trek Game in Action
Conclusion
Game programming has never been more accessible to the developer as it has now with XNA and Visual Studio Express. With VS.NET Express, You can quickly throw together a 2D or 3D game with high quality sounds and graphics. If you wish to develop games for the XBox using XNA, you need to join the XNA Creators Club, a club which also provides resources for game developers. Anyway, if you are game for some fun development that can provide fun for others, I invite you to look into the XNA framework. It will certainly make your life easier with the help of C# and .NET.
Note: In order to lighten the download, I have cut out a lot of the files that get generated by the project. You'll need to build the project to get the game to work.