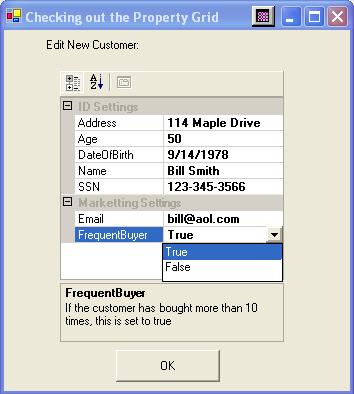
Figure 1 - The property grid in action
Are you familiar with that window in Visual Studio .NET that lets you edit all your forms? You know, the one that you wish you could add to all your programs because it has such a cool interface? You know, the Property Window! Well guess what? You can add it to your windows form as part of your design and use it to allow users to edit class properties directly because Microsoft has provided it, they just don't display it initially in the toolbox.The control is called the Property Grid and you have full access to it. Simply right click on the toolbox and choose Add/Remove Items... as shown in figure 2 below:

Figure 2 - Adding the Property Grid to the ToolBox
This will bring up the Customize Toolbox dialog which will give you a choice of either .NET Components or COM Components. Scroll down to PropertyGrid, check this item and click OK.Walla! You now have access to a very powerful editting control in which you can allow users to edit properties in your classes through the slick interface of the property grid.
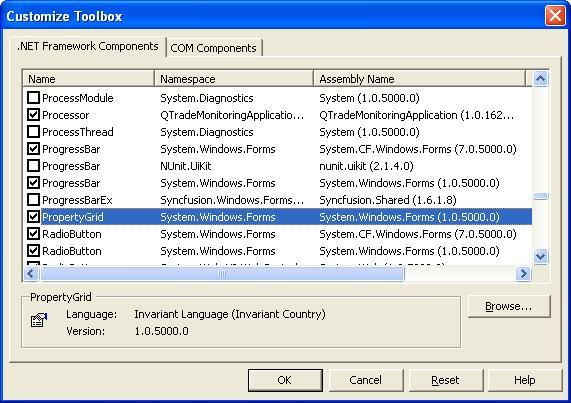
Figure 3 - Customize ToolBox Dialog for Adding your PropertyGrid Control to the Toolbox
Readying your Class for the Property Grid
The property grid is fairly easy to use.The hard part is making the class that you want to display in the grid "Property Grid Friendly". The first step is to create public properties for fields you want to expose. All properties should have get and set methods.(If you don't have a get method, the property won't show up in the PropertyGrid). If you just do the bare minimum of making public properties with get and set methods, your class instance can be displayed in the property grid. However, your property grid will be void of descriptions, categories and other niceties that property grids such as Visual Studio.NET contains. In order to really make your property grid soar, you need to add special attributes to each of your properties. These attributes are contained in the System.ComponentModel namespace and are shown in the table below:
| Attribute |
Description |
| CategoryAttribute |
This attribute places your property in the appropriate category in a node on the property grid. |
| DescriptionAttribute |
This attribute places a description of your property at the bottom of the property grid |
| BrowsableAttribute |
This is used to determine whether or not the property is shown or hidden in the property grid |
| ReadOnlyAttribute |
Use this attribute to make your property read only inside the property grid |
|
DefaultValueAttribute |
Specifies the default value of the property shown in the property grid |
|
DefaultPropertyAttribute |
If placed above a property, this property gets the focus when the property grid is first launched. Unlike the other attributes, this attribute goes above the class. |
Table 1 - Attributes to ready your class's properties for the property grid
The Customer Class
Now we are ready to create our customer class to make it displayable in the property grid.In order to utilize the property grid attributes in Table 1, we need to import the namespace for these attributes so we add the using clause for the System.ComponentModel:
using
System.ComponentModel;
Then we simply create the customer class with private fields and public properties that access these fields. Attributes are placed above the properties to ready each property for the property grid.
Listing 1 - PropertyGrid-Ready Customer Class
/// <summary>
// Customer class to be displayed in the property grid
/// </summary>
///
[DefaultPropertyAttribute("Name")]
public class Customer
{
private string _name;
private int _age;
private DateTime _dateOfBirth;
private string _SSN;
private string _address;
private string _email;
private bool _frequentBuyer;
// Name property with category attribute and
// description attribute added
[CategoryAttribute("ID Settings"), DescriptionAttribute("Name of the customer")]
public string Name
{
get
{
return _name;
}
set
{
_name = value;
}
}
[CategoryAttribute("ID Settings"),
DescriptionAttribute("Social Security Number of the customer")]
public string SSN
{
get
{
return _SSN;
}
set
{
_SSN = value;
}
}
[CategoryAttribute("ID Settings"),
DescriptionAttribute("Address of the customer")]
public string Address
{
get
{
return _address;
}
set
{
_address = value;
}
}
[CategoryAttribute("ID Settings"),
DescriptionAttribute("Date of Birth of the Customer (optional)")]
public DateTime DateOfBirth
{
get
{
return _dateOfBirth;
}
set
{
_dateOfBirth = value;
}
}
[CategoryAttribute("ID Settings"), DescriptionAttribute("Age of the customer")]
public int Age
{
get
{
return _age;
}
set
{
_age = value;
}
}
[CategoryAttribute("Marketting Settings"), DescriptionAttribute("If the customer as bought more than 10 times, this is set to true")]
public bool FrequentBuyer
{
get
{
return _frequentBuyer;
}
set
{
_frequentBuyer = value;
}
}
[CategoryAttribute("Marketting Settings"), DescriptionAttribute("Most current e-mail of the customer")]
public string Email
{
get
{
return _email;
}
set
{
_email = value;
}
}
public Customer()
{
}
}
Assigning the PropertyGrid an Object
All that is left to do to get the grid running is assign an instance of our customer class to the property grid.The property grid will automatically figure out all the fields of the customer through reflection and display the property name along with the property value on each line of the grid. Another nice feature of the property grid is it will create special editing controls on each line that correspond to the value type on that line.For example, a Date of Birth property (of type DateTime) of the customer will allow you to edit the value of the the date with the calendar control. Booleans can be edited with a combo box showing True or False (saves you from excess typing).
In Listing 2 we created a new customer and populated it with values through its properties.We then use the SelectObject property of the PropertyGrid and assign our customer object to this property.Upon assigning the customer to the grid, the grid will display all of the public properties we defined in our Customer class.
Listing 2 - Assigning the customer object to the property grid.
private void Form1_Load(object sender, System.EventArgs e)
{
// Create the customer object we want to display
Customer bill = new Customer();
// Assign values to the properties
bill.Age = 50;
bill.Address = " 114 Maple Drive ";
bill.DateOfBirth = Convert.ToDateTime(" 9/14/78");
bill.SSN = "123-345-3566";
bill.Email = [email protected];
bill.Name = "Bill Smith";
// Sets the the grid with the customer instance to be
// browsed
propertyGrid1.SelectedObject = bill;
}
Examining the Results
Figure 1 shows the results of our efforts of creating a property grid in our form. If we examine figure 1 again we see that the two categories we defined in our CategoryAttribute,ID Settings and Market Settings, are shown as headers in the two tree nodes.The description of the FrequentBuyer is shown at the bottom of the PropertyGrid retrieved from our DescriptionAttribute for the FrequentBuyer property.Upon selecting the boolean FrequentBuyer property value, we get a drop down for the possible boolean values, True or False.
Conclusion
The property grid is a powerful control for allowing users to edit the internals of your published classes.Because of the ability for the property grid to reflect and bind to your class, there is not much work involved in getting the property grid up and working.You can add categories and descriptions to your property grid by using the special grid attributes in the System.Component model.Anyway, here is yet another powerful control available to you and the latest property of your .NET mindshare.