Image manipulation and thumbs creation with C#


It is a common thing to do; creating small thumbnails of your images for displaying in your web site. Sometimes you can store the high quality 5-6MB large image on your web server and create the other image sizes needed "on the fly" each time displayed, just living with one image on disk, but this isn't always the most suitable solution, especially if you have a lot of images. It could be better to create the images having those sizes you need and saving them on disk.


I looked thru different articles on this subject and they mostly explain the scenario for changing just one image at a time but this is seldom the everyday need. No, normally you have a bunch of images you need to convert and often you need the ability to do it batch wise, as well.


I've created a small solution that covers the most basic creation of thumbs and I would like to share it so others can use it, both the application and the code itself. I would really appreciate some feedback on the image creation part of it, so if you have better or simpler solution, please comment how to improve the application itself. Please feel free to download bend and break it and change it to suits your needs, but please leave some comments in the code referring to where you got it and who originally made it. I've loaded the code with lots of comments to make it easy for beginners to follow the flow and thought behind the code lines. Thanks!

This is a re-write from a production application I wrote some time ago and these are the original requirements I had when I first created the application:

1. Create different sizes from one picture in "one go"

2. Possibility to do it in batch mode
3. Possibility to add an extra char to the image name
4. Possibility to set the height, the width or max height or max width based upon the format. (Landscape or Portrait)

resizer_app.jpg

Okay, as you all can see, I'm not a form designer (!!!) The original application was a Windows service without a visual interface. Anyway, the thing intended here is to simplify the image resizing and keeping the ability to resize images in batch mode. (Again, just to clarify: I'm not chasing any design awards here!!!)

It's a pretty straight forward process; select the pictures you want to change, add the different sizes you need, select the save path and fire off the resize images button. The application has also the possibility to take five command line arguments and then exit by an overloaded form constructor, which can be useful if you put the arguments in an AT command and run it from a schedule, suddenly you have a working batch application. The start command should look like this: SampleWindowsFormsApplication.exe c:\images 210 210 3 none.
(It is well commented in the code)


// args[0]: Directory to where the original files are located

// args[1]: The height of the new images

// args[2]: The width of the new images

// args[3]: The resizeformat (0 = Exact with & height, 1 = Max width,
// 2 = Max height, 3 = Max with or height)
// args[4]: Possible addition char to the new file name. "None" represents // nothing to add

Okay, let's go thru the simple GUI

From the file menu you have the possibility to select images on a file to file basis, and also the ability to select all the files in a folder. The files are added to the grid, displaying the filename, the path to the file and the image type as a visual information on what is selected. Here you also have the possibility to clear both the grid from selected files and also clear the size selections made.

resizer_menu.jpg

Down to the left corner you have the ability to add "size selections" and the program will loop thru all of the added variants here. This little option makes it possible to create different sizes of the same image in one go. Here you can add the extra char to the filename, as well.

resizer_sizeselections.jpg

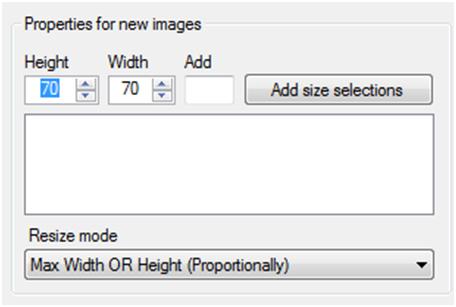
When you've selected the files you want to use, decide how you would like to change your images by adding the size selections by clicking the add button. Here is a short explanation of the different resize modes:

Exact width and height
This option just creates a new bitmap with the size given, not taking any proportions into consideration.

Exact width

This mode gives the image a fixed width and calculates the proportional height.

if (format == ResizeFormat.Max_Width)

{

   // We just do images smaller, so we just resize if

   // the original image is larger that the new size

   if (f_width > Width)

      Width = (int)((float)(Height) * dim);

}

Exact height

This mode gives the image a fixed height and calculates the proportional width.

else if (format == ResizeFormat.Max_Height)

{

   // We just do images smaller, so we just resize if

   // the original image is larger that the new size

   if (f_height > Height)

      Height = (int)((float)(Width) / dim);

}

Max width OR height
This mode checks the size of the original image and determents if it's a landscape or portrait image, then it calculates the suitable height or width based upon that.

else if (format == ResizeFormat.Max_Width_OR_Height)

{

   // We just do images smaller, so we just resize if

   // the original image is larger that the new sized

   if (f_width > Width && f_height > Height)

   {

      //Portrait images, persist max height, calculate width

      if (f_height > f_width)

         Width = (int)((float)(Height) * dim);

      // Landscape image, persist max width, calculate height

      else

         Height = (int)((float)(Width) / dim)
   }
}


This option is forcing you to give a square size of the image in, (50x50, 100x100, etc.), and the event ValueChanged of the NumericUpAndDown control keeps track of the selections made forcing it to be equal to the height or the width given.
Okay, then there is the location of where the new files are created and the actual "resize button".

resizer_savepath_and_button.jpg

The program saves the last selected files directory as the save directory for the new images, but you can easily change it. When the new files are created, there is one directory for each size selection created in that "save directory" to make it easier to keep track of the resized images.

The creation of the new image and quality settings.

After we have calculated the proportional height or width depending on our format selection described above, we have a new height and width. From that we use these dimensions to create a new bitmap whitch is the base for our new image:

System.Drawing.Bitmap bitmap = new System.Drawing.Bitmap(Width, Height);

Then we create the graphics object from the bitmap with:


System.Drawing.Graphics graphic = System.Drawing.Graphics.FromImage(bitmap)


Now we set quality properties on the graphics object before we use it to draw the original on to our new bitmap:

graphic.InterpolationMode = Drawing2D.InterpolationMode.HighQualityBicubic;

graphic.SmoothingMode = Drawing2D.SmoothingMode.HighQuality;

graphic.PixelOffsetMode = Drawing2D.PixelOffsetMode.HighQuality;

graphic.CompositingQuality = Drawing2D.CompositingQuality.HighQuality;graphic.DrawImage(OriginalImage, 0, 0, Width, Height);

I'm not an expert on graphics, so this is perhaps a part of the application which can be improved. Please post your comments so I can upgrade to code and upload it again.

That's it!

Conclusion: The power of C# makes it simple and straightforward to work with images and by it's richness of classes you can actually create a very well working application with a minimum of code.


erver'>
Up Next
    Ebook Download
    View all
    Learn
    View all