This article has been excerpted from book "Graphics Programming with GDI+ ".
An arc is a portion of an ellipse. For example, Figure 3.12 shows an ellipse that has six arcs. An arc is defined by bounding rectangle (just as an ellipse), a start angle, and a sweep angle. The start angle is an angle in degree measured clockwise from the x-axis to the starting point of the arc.
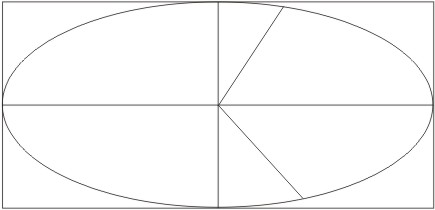
FIGURE 3.12: Arcs in an ellipse
The sweep angle is an angle in degree measured clockwise from the startAngle parameter to the ending point of the arc. So an arc is the portion of the perimeter of the ellipse between the start angle and the start angle plus the sweep angle.
The DrawArc method draws an arc on a graphics surface. DrawArc takes a pen, a pair of coordinates, a width, and a height. There are many DrawArc overloaded methods. An application can use a Rectangle or RectangleF object and integer or float coordinates:
public void DrawArc(Pen, Rectangle, float, float);
public void DrawArc(Pen, RectangleF, float, float);
public void DrawArc(Pen, int, int, int, int, int, int);
public void DrawArc(Pen, float, float, float, float, float, float);
The Pen object determines the color, width, and style of the arc; Rectangle or RectangleF represents the bounding rectangle; and the last two parameters are the start angle and sweep angle.
To draw an arc, the application creates Pen and Rectangle objects and defines start and sweep angles. Then it calls the DrawArc method.
Let's create an application that will draw an arc to match the values of the start and sweep angles. We create a Windows application, adding add two text boxes and a button control. The final form look like Figure 3.13.
We define two floating variable on the class level to store the start and sweep angles:
FIGURE 3.13: A sample arc application
private float startAngle = 45.0F
private float sweepAngle = 90.0F;
Note let's draw an arc on the form's pain event handler. Listing 3.11 draws an arc. We first create a pen and a rectangle, and we use them in the DrawArc method with start and sweep angles.
LISTING 3.11: The paint event handler
private void Form1_Paint (object sender,
System.Windows.Forms.PaintEventArgs e)
{
Pen redPen = new Pen (Color.Red, 3);
Rectangle rect = new Rectangle (20, 20, 200, 200);
e.Graphics.DrawArc (redPen, rect, startAngle, sweepAngle);
redPen.Dispose();
}
New we add code for the Reset Angles button. Listing 3.12 simply sets the start and sweep angles by reading values from the text boxes and calls the Invalidate method, which forces GDI+ to call the form's paint event handler:
LISTING 3.12: The Reset Angles button click event handler
private void ResetAnglesBtn_Click(object sender,
System.EventArgs e)
{
startAngle = (float)Convert.ToDouble (textBox1.Text);
sweepAngle = (float)Convert.ToDouble (textBox2.Text);
Invalidate();
}
Figure 3.14 shows the default output from the application
Now let's change the start and sweep angles to 90 and 180 degrees, respectively, and click the Reset Angles button. The new output looks like Figure 3.15.
FIGURE 3.14: The default arc, with start angle 45 degrees and sweep angle with 90 degree

FIGURE 3.15: An arc with start angle 90 degrees and sweep angle of 180 degrees
Let's changes angles one more time. This time our start angle will be 180 degrees, and the sweep angle will be 360 degrees. The new output looks like Figure 3.16.
Conclusion
Hope the article would have helped you in understanding how to to draw arcs in GDI+. Read other articles on GDI+ on the website.
 |
This book teaches .NET developers how to work with GDI+ as they develop applications that include graphics, or that interact with monitors or printers. It begins by explaining the difference between GDI and GDI+, and covering the basic concepts of graphics programming in Windows. |