This article explains the necessary steps required to write a data base application using ADO.NET.
Choosing a .NET Data Provider
The first step is to decide what .NET data provider you will use in your application. There are many data providers that work with multiple data sources, including OleDb, Sql, and ODBC. You use OleDb data providers to access OLE-DB data source. Sql data providers work with ODBC data sources. You can also use more than one data provider to access the same database. For example, you can use OleDb and ODBC data providers to work with Microsoft access databases.
I'm going to show you sample applications. The application uses Ole Db data providers to data an access an access 2000 database.
Adding namespace references
The second step is to add references to the assembly and include the namespaces in your project. You can add references to the project using the project > Add reference option. Figure shows you how to add a reference to the System.Data.dll assembly. If you are compiling your program from the command line, you can add a reference to the assembly from the command line. I'll discuss this process in the following example.
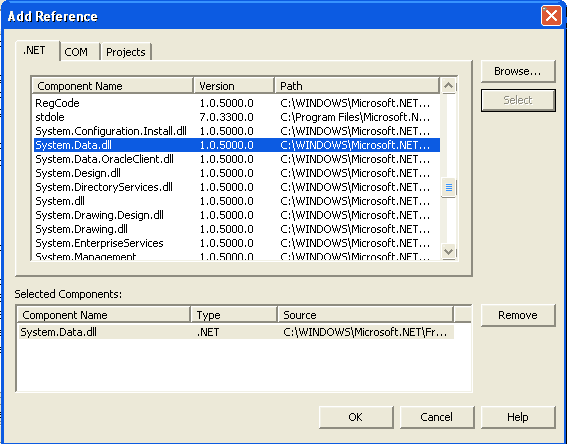
Figure: Adding a reference to the System.Data.dll assembly
After adding a reference to the assembly, you need to include namespaces in your project by using the using namespace. The following code shows how to include the System, System.Data, System.Data.Common and System.Data.OleDb namespaces:
using System;
using System.Data;
using System.Data.Common;
using System.Data.OleDb;
Note: If you are using Sql or ODBC data providers, you need to include the System.Data.Sql or the Microsoft.Data.Odbc namespaces.
Establishing a connection
Now the next step is to create a Connection object. You create a ConnectionObject using the data provider's Connection class. In the following code, you use the OleDbConnection class to create a connection with an Access 2000 database. The OleDbConnection constructor takes one parameter of a string type, connectionString, which has two parts. First it has a provider, and second, it has the path of the data source. As you can see from the following code, I used the Microsoft.Jet.OLEDB.4.0 provider and the northwind.mdb data source:
string connectionString = "Provider= Microsoft.JET.OLEDB.4.0; Data source =c:\\ Northwind.mdb";
OleDbConnection conn = new OleDbConnection (connectionString);
Note: In this sample the northwind.mdb database path is "C:\\northwind.mdb". You can use any database you want. You just need to change the path and name of the database and the table names you are using in SQL statements to access the data.
Creating a Command or Data Adapter object
The next step is to create a DataAdapter or Command object. You create a Command object by using OleDbCommand class.
The OleDbCommand constructor takes two parameters. The first is SQL query and the second is the Connection object. You create a SELECT SQL query from the Customers table in the Northwind database. The following code shows how to create a Command object:
// SELECT SQL Query
string sql = "SELECT CustomerID, ContactTitle FROM Customers";
Filling Data to a Dataset or Data Reader Object
The next step is to open the Connection by calling the Open method of the Connection object and reading data from the Command object. The ExecuteReader method, OleDbCommand returns data in an OleDbReader object. A DataReader object reads fast and forward only cached data. The following lines of code show this:
conn.Open();
OleDbDataReader reader;
reader = cmd.ExecuteReader();
Displaying Data
The Next step is to do some operation on the data. In this example, you'll display data on the console. The Read method of OleDbDataReader reads data. The DataReader class has Getxxx methods, which return different types of data. The Getxxx methods take an index of the field you want to read data of. In the following code, you read data from two fields of the Customers table, whose indexes are 0 and 1:
while (reader.Read())
{
Console.Write(reader.GetString(0).ToString() + " , ");
Console.Write(reader.GetString(1).ToString() + " ,");
Console.WriteLine("");
}
Closing the Connection
The last step is to close the reader and connection objects by calling their Close methods:
reader.Close();
conn.Close();
Conclusion
Hope this article would have helped you in understanding basic steps required to write an ADO.NET Application. See my other articles on the website on ADO.NET.