This article has been excerpted from book "Graphics Programming with GDI+".
In this article we create an application, GDI+Painter that you can use to draw and fill simple graphics objects. If you wish, you can add more functionality to the application. Once you are done graphics shapes, the program allows you to save your drawing in bitmap format. You can modify the program to save a drawing in .jpeg or .gif format.
The program is a Windows Forms application and looks like Figure 3.42. It has three draw buttons (line, ellipse, and rectangle) and two fill buttons (rectangle and ellipse). The Save Image button allows you to save the image.
Click on a button and the program draws the selected item on the form.
Here's how it works:
First we define some private class-level variables:
//Variables
private Bitmap bitmap = null;
private Bitmap curBitmap = null;
private bool dragMode = false;
private int drawIndex = 1;
private int curX, curY, x, y;
private int diffX, diffY;
private Graphics curGraphics;
private Pen curPen;
private SolidBrush curBrush;
private Size fullSize;
The next step is to initialize objects. On the form-load event handler, we create a bitmap and a Graphics object from the bitmap, which represents the entire form. We set its background color to the form's background color by calling the Graphics.Clear method. We also create a Pen object and a Brush object when the form loads. Listing 3.31 gives the form-load event handler code.
Listing 3.31: The form-load event handler
private void Form1_Load(object sender, System.EventArgs e)
{
// Get the full size of the form
fullSize = SystemInformation.PrimaryMonitorMaximizedWindowSize ;
// Create a bitmap using full size
Bitmap = new Bitmap (fullSize.Width, fullSize.Height);
// Create a Graphics object from Bitmap
curGraphics = Graphics.FromImage(bitmap);
// Set backgound color as form's color
curGraphics.Clear (this.BackColor);
// Create a new pen and brush as
// default pen and brush
curPen = new Pen (Color.Black);
curBrush = new SolidBrush(Color.Black);
}
When we click on a button, we find out which button was selected and save it in the drawIndex variable. Listing 3.32 gives code for the button click event handler for all buttons.
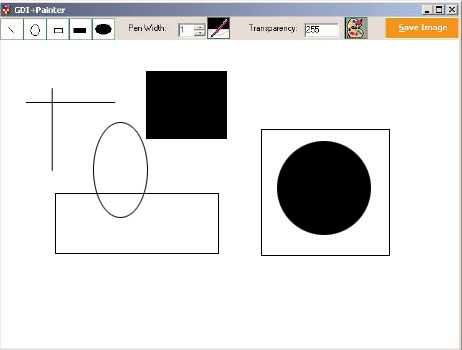
Figure 3.42: The GDI+Painter application
Listing 3.32: Saving a selected button
private void LineDraw_Click (object sender, System.EventArgs e)
{
drawIndex = 1;
}
private void RectDraw_Click (object sender, System.EventArgs e)
{
drawIndex = 2;
}
private void EllipseDraw_Click (object sender, System.EventArgs e)
{
drawIndex = 3;
}
private void FilledEllipse_Click (object sender, System.EventArgs e)
{
drawIndex = 5;
}
When we start drawing on the form, we save the starting point on the mouse-down events and the ending point on the mouse-up events (see Listing 3.33). From these two points we can determine the area of the rectangle we're trying to draw. We use this rectangle in draw and fill methods.
On a mouse-move event, we calculate the difference between the ending and starting point that are used to draw the rectangle. Notice also that on mouse down we set dragMode to true, and on mouse up we set dragMode to false. On the basis of the area covered by user selection, we draw or fill objects on mouse up, which gives the user a visible drawing effect. You will also see the RefreshFromBackground method, which we will discuss shortly.
Listing 3.33: The mouse-down even handler
private void Form1_MouseDown(object sender, System.Windows.Forms.MouseEventArgs e)
{
// store the starting point of the rectangle and se the drag mode to true
curX = e.X;
curY = e.Y;
dragMode = true;
}
private void Form1_MouseMove(object sender, System.Windows.Forms.MouseEventArgs e)
{
// Find out the ending point of the rectangle and calculate the
// Difference between starting and ending
// points to find out the height and width
// of the rectangle
x = e.X;
y = e.Y;
diffX = e.X - curX;
diffY = e.Y - curY;
// If dragMode is true call refresh
// to force the window to repaint
if (dragMode)
{
this.Refresh();
}
}
private void Form1_MouseUp(object sender, System.Windows.Forms.MouseEventArgs e)
{
diffX = x-curX;
diffY = y-curY;
switch(drawIndex)
{
case 1:
{
// Draw a line
curGraphics.DrawLine (curPen, curX, curY, x, y);
break;
}
case 2:
{
// Draw an ellipse
curGraphics.DrawEllipse (curPen, curX, curY, diffX, diffY);
break;
}
case 3:
{
// Draw a rectangle
curGraphics.DrawRectangle (curPen, curX, curY,
diffX, diffY);
break;
}
case 4:
{
// Fill the rectangle
curGraphics.FillRectangle (curBrush, curX, curY,
diffX, diffY);
break;
}
case 5:
{
// Fill the ellipse
curGraphics.FillEllipse (curBrush, curX, curY,
diffX, diffY);
break;
}
// Refresh
RefreshFormBackground();
// Set drag mode to false
dragMode = false;
}
}
Now we add code to the form's paint event handler, which draws and fills the object. Listing 3.34 gives the code for the OnPaint method.
Listing 3.34: The OnPaint method
private void Form1_Paint(object sender, System.Windows.Forms.PaintEventArgs e)
{
Graphics g = e.Graphics;
// If dragMode is true, drag the selected graphics shape
if (dragMode)
{
switch(drawIndex)
{
case 1:
{
g.DrawLine (curPen, curX, curY, x, y);
break;
}
case 2:
{
g.DrawEllipse (curPen, curX, curY, diffX, diffY);
break;
}
case 3:
{
g. DrawRectangle (curPen, curX, curY, diffX, diffY);
break;
}
case 4:
{
g.FillRectangle (curBrush, curX, curY, diffX, diffY);
break;
}
case 5:
{
g.FillEllipse (curBrush, curX, curY, diffX, diffY);
break;
}
}
}
Here's little trick. You may have noticed that we use the RefrehFormBackground method. This method sets the current drawing as the background of the form. Listing 3.35 gives code for the method.
Listing 3.35: The RefreshFormBackground method
private void RefreshFormBackground()
{
curBitmap = bitmap.Clone(
new Rectangle (0, 0, this.Width, this.Height), bitmap.PixelFormat);
this.BackgroundImage = curBitmap;
}
The Save Image button allows us to save the image by simply calling the Save method of Bitmap. These Save method takes a file name and format. We use SaveFileDialog to select the file name. Listing 3.36 gives code for the Save Image button.
Listing 3.36: The Save Image button click handler
private void SaveBtn_Click (object sender, System.EventArgs e)
{
// Save file dialog
SaveFileDialog saveFileDlg = new SaveFileDialog();
saveFileDlg.Filter =
"Image files (*.bmp )|*.bmp |All files (*.* )|*.*";
if (saveFileDlg.ShowDialog() == DialogResult.OK)
{
// Create bitmap and call save method to save it
Bitmap tmpBitmap = bitmap.Clone
(new Rectangle (0,0, this.Width, this.Height), bitmap.PixelFormat);
tmpBitmap.Save(saveFileDlg.FileName,ImageFormat.Bmp);
}
}
In the end we release all objects, which we can do on the form-closed event (see Listing 3.37).
Listing 3.37: The form-closed event handler
private void Form1_Closed (object sender, System.EventArgs e)
{
// Dispose of all public objects
curPen.Dispose();
curBrush.Dispose();
curGraphics.Dispose();
}
Conclusion
Hope the article would have helped you in understanding the GDI+Painter Application. Read other articles on GDI+ on the website.
 |
This book teaches .NET developers how to work with GDI+ as they develop applications that include graphics, or that interact with monitors or printers. It begins by explaining the difference between GDI and GDI+, and covering the basic concepts of graphics programming in Windows. |