HTML5 Canvas For Beginners : Part 1
HTML5 Canvas For Beginners: Part 1

In my previous article, I described the history of HTML5. Now in this article, I'm going to talk about browser support, the "<canvas>" element and drawing a line in detail with some examples.
<Canvas> Element
The Canvas element is part of the HTML5 specification (http://www.whatwg.org/specs/web-apps/current-work/multipage/) that includes many new features. HTML5 canvas gives you power to draw excellent graphics using JavaScript. You can create various shapes, transformations, animations and so on. You can even create games in HTML5 canvas; here is an example of a snake game using the HTML5 canvas.
Using the HTML5 canvas element is very easy. We just need to place the canvas tag inside the <body> tag of our HTML document and we can access the <canvas> tag using JavaScript. Now we need to create a context so that we can utilize the HTML5 Canvas API to draw our visualization. The Canvas element is a simple HTML tag in which we need to define width and height. Here is a simple example:
<html>
<head>
<title>Canvas Template</title>
</head>
<body>
<div>
<!-- Draw a Canvas -->
<canvas id="drawCanvas" width="600" height="500"></canvas>
<script>
var drawCanvas = document.getElementById('drawCanvas');
var ctx = drawCanvas.getContext('2d');
</script>
</div>
</body>
</html>
Browser Support
Whenever we talk about HTML5 it is necessary to also explain browser compatibility, which is pretty amazing. You can also check a browser's compatibility through HTML5Test.com. Every modern browser currently support HTML5, including 2D canvas context capabilities and finally Internet Explorer is now able to support it. Here is a list of browsers that support HTML5:

-
Opera(10.0+)
-
Firefox(3.0+)
-
Chrome(3.0+)
-
Safari(3.0+)
-
Internet Explorer(9.0+)
-
iOS(1.0+)
-
Android(1.0+)
-
Blackberry10
The 2D Context API
We have explained the <canvas> element but it doesn't mean that you are drawing on the canvas element. Actually you are drawing on the 2D rendering context that can be accessible by the canvas element via the JavaScript API. In simple words, the canvas context is an object with methods and properties that we can use inside the canvas element to render graphics. A canvas element can contain only one context at a time.
Drawing Simple Lines
Now you know some of the basics of HTML5 Canvas. We can start from the very basics by drawing a line in HTML5 canvas. To draw a line we need to use some predefined methods like "beginPath()", "moveTo()", "lineTo()" and "stroke()" to draw a line.
-
beginPath(): Specifies that we are going to start a new line.
-
moveTo(): Specifies the position of the context point or drawing cursor from where we need to draw our line.
-
lineTo(): Draws a line from the starting point to a new point, or the point given in moveTo() method to lineTo() method.
-
closePath(): It connects the last point from the starting point and then it closes the path.
-
strokeStyle(): Specifies the color of a line.
-
stroke(): Makes a line visible to the world.
-
lineWidth(): Sets the width of a line.
Example:
<body>
<form id="form1" runat="server">
<div>
<!-- Draw a Canvas -->
<canvas id="drawCanvas" width="600" height="500"></canvas>
<script>
var drawCanvas = document.getElementById('drawCanvas');
var ctx = drawCanvas.getContext('2d');
ctx.beginPath();
ctx.moveTo(100, 50); // Starting Points (x1,y1)
ctx.lineTo(500, 300); // Ending Points (x2,y2)
ctx.lineWidth = 13; //Set LineWidth
ctx.strokeStyle = '#00ffa0'; //Set LineColor
ctx.closePath();
ctx.stroke(); // To make a line visible
</script>
</div>
</form>
</body>
</html>
Drawing Line Caps
If you want to add a cap into a line then you can use "lineCap" property of HTML5 Canvas. The HTML5 Canvas APIs have three types of line caps: "square", "round" and "butt." Lines of HTML5 Canvas are by default "butt" styles. And it is necessary to set the "lineCap" property before the "stroke()" method.
Example:
<body>
<form id="form1" runat="server">
<div>
<!-- Draw a Canvas -->
<canvas id="drawCanvas" width="600" height="500"></canvas>
<script>
var drawCanvas = document.getElementById('drawCanvas');
var ctx = drawCanvas.getContext('2d');
ctx.beginPath();
ctx.moveTo(160, 50);
ctx.lineTo(160, 300);
ctx.lineWidth = 13;
ctx.strokeStyle = '#ff0000';
ctx.lineCap = 'round';
ctx.stroke();
ctx.beginPath();
ctx.moveTo(240, 50);
ctx.lineTo(240, 300);
ctx.lineWidth = 13;
ctx.strokeStyle = '#00ff00';
ctx.lineCap = 'butt';
ctx.stroke();
ctx.beginPath();
ctx.moveTo(320, 50);
ctx.lineTo(320, 300);
ctx.lineWidth = 13;
ctx.strokeStyle = '#0000ff';
ctx.lineCap = 'square';
ctx.stroke();
</script>
</div>
</form>
</body>
Line Join
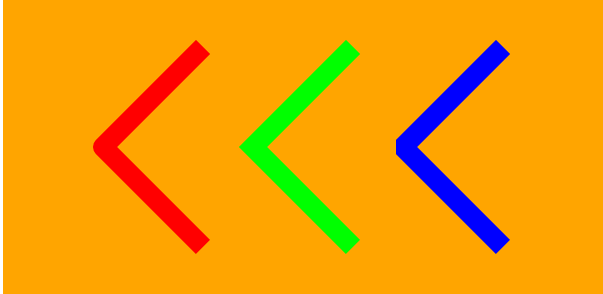
In HTML5 Canvas, we can join two or more lines by using the "lineJoin" context property. Paths can have one of three line joins:
-
round
-
miter
-
bevel
By default, the HTML5 Canvas line join property is set to the "miter" style. Let's see an example:
Example
<body>
<form id="form1" runat="server">
<div>
<!-- Draw a Canvas -->
<canvas id="drawCanvas" width="600" height="500"></canvas>
<script>
var drawCanvas = document.getElementById('drawCanvas');
var ctx = drawCanvas.getContext('2d');
ctx.lineWidth = 20;
ctx.beginPath();
ctx.moveTo(200, 50);
ctx.lineTo(100, 150);
ctx.lineTo(200, 250);
ctx.strokeStyle = '#ff0000'
ctx.lineJoin = 'round';
ctx.stroke();
ctx.beginPath();
ctx.moveTo(350, 50);
ctx.lineTo(250, 150);
ctx.lineTo(350, 250);
ctx.strokeStyle = '#00ff00'
ctx.lineJoin = 'miter';
ctx.stroke();
ctx.beginPath();
ctx.moveTo(500, 50);
ctx.lineTo(400, 150);
ctx.lineTo(500, 250);
ctx.strokeStyle = '#0000ff'
ctx.lineJoin = 'bevel';
ctx.stroke();
</script>
</div>
</form>
</body>
Color Fill
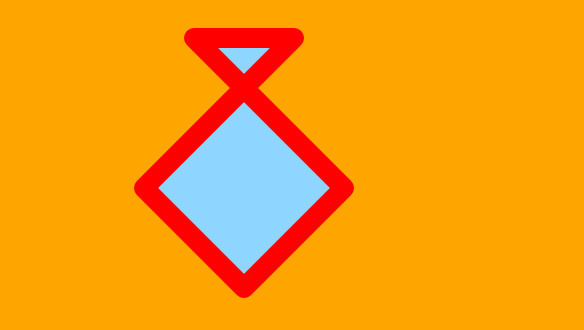
In HTML5 Canvas, we can fill a shape with a solid color by using the "fillStyle" property to a color string, for example "green" is a RGB value such as rgb(0,255,0) or by providing a hex value such as #00FF00. After that, the "fill()" method can be used to fill the shape. By default, the HTML5 Canvas shape's fillStyle property is set to the black color.
*Note: If you are using both stroke and fill for a shape, then try to use the fill() method before the stroke() method. Otherwise, the fill will overlap half of the stroke.
Example
<body>
<form id="form1" runat="server">
<div>
<!-- Draw a Canvas -->
<canvas id="drawCanvas" width="600" height="500"></canvas>
<script>
var drawCanvas = document.getElementById('drawCanvas');
var ctx = drawCanvas.getContext('2d');
ctx.beginPath();
ctx.moveTo(300, 50);
ctx.lineTo(150, 200);
ctx.lineTo(250, 300);
ctx.lineTo(350, 200);
ctx.lineTo(200, 50);
ctx.closePath();
ctx.lineWidth = 20;
ctx.fillStyle = '#8ED6FF';
ctx.fill();
ctx.lineJoin = 'round';
ctx.strokeStyle = '#ff0000'
ctx.stroke();
</script>
</div>
</form>
</body>


